For administrators with Remind Hub.
Welcome to your Remind administrator dashboard! To take a step-by-step tour of the dashboard features, please read on for a detailed description of what actions you can take via each tab of your dashboard. This article also has links to resources that’ll provide more in-depth information about the tasks you can complete in each tab.
Administrator dashboards are set up on the district and school level. If you have district privileges, you can access the district dashboard, as well as the admin dashboards for each school in your district. If you are a school admin, you'll only see the school dashboard when you click on the name of the school for which you are an admin. To access your dashboard, log in to Remind.com and select the name of the district or school from the navigation menu on the left side of the screen.
We encourage you to share this article with other admin users in your district and schools!
If you don't see the admin dashboard, and feel that you should have admin access for your district or school, please contact one of your schools verified administrators, and they can give you access.
This article contains the following sections:
*This tab will only show for organizations that have purchased that premium feature.
Left Navigation Menu
|
|
The left navigation menu gives you access to:
|
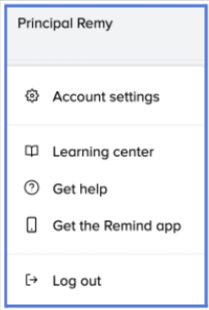 |
Click on your name at the top to access your Account settings and other features.
|
School admin dashboard
The school dashboard is where you can see more details about people and classes connected to your school. School dashboards include the following tabs:
School Overview
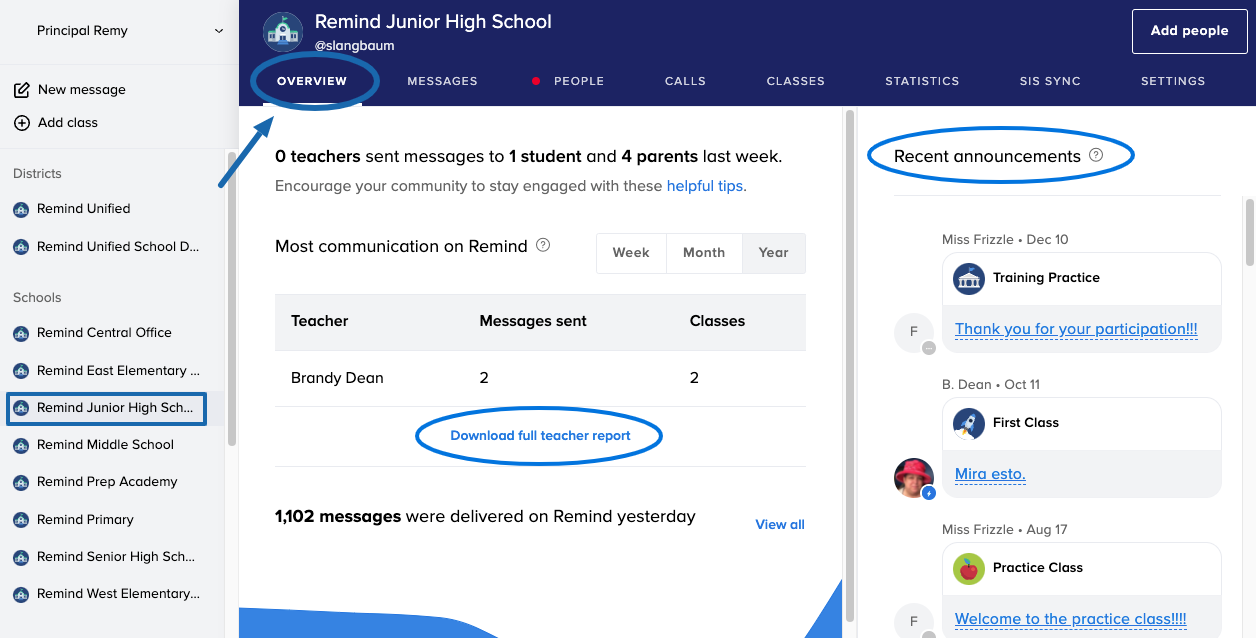
- The Overview tab includes at-a-glance statistics to help you understand how your teachers, parents, and students communicated with one another in the last week, month, or year. This tab also lists the teachers who have sent out the most messages.
- You have the option to Download the full teacher report. This report includes a list of all of your organization's teachers, the total number of messages they've sent, announcements they’ve sent, how many conversation chats and reactions they’ve sent, and the number of classes they own.
- On the right, you can see Recent announcements that your teachers/staff have sent.
Return to top of page Return to School admin dashboard
School Messages
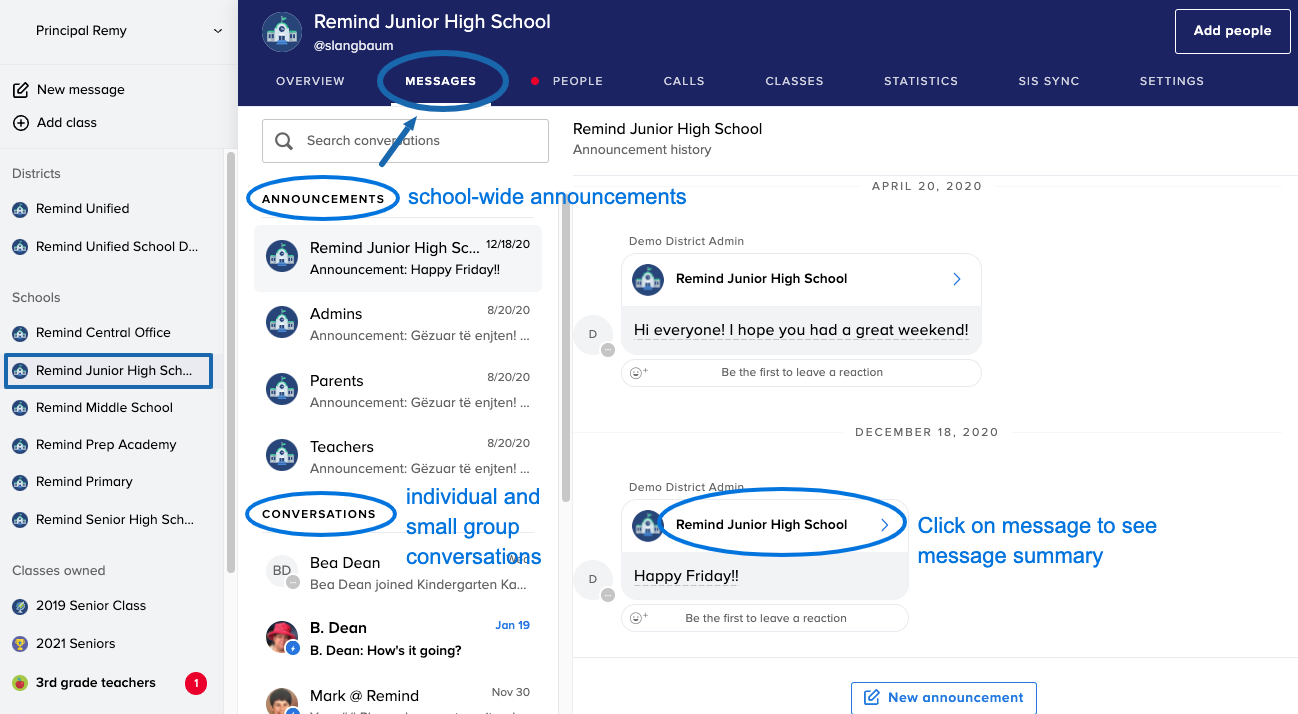
- The Messages tab shows streams of information flowing between you and your community.
- Announcements shows a record of school-wide and role-based announcements that have been sent and by whom.
- In the Conversations section, you can click on any teacher, student, parent, or group conversation to see the stream of messages sent and received.
- You can click on any announcement sent to see message delivery summary and learn how many people have received and read that message.
Return to top of page Return to School admin dashboard
School People
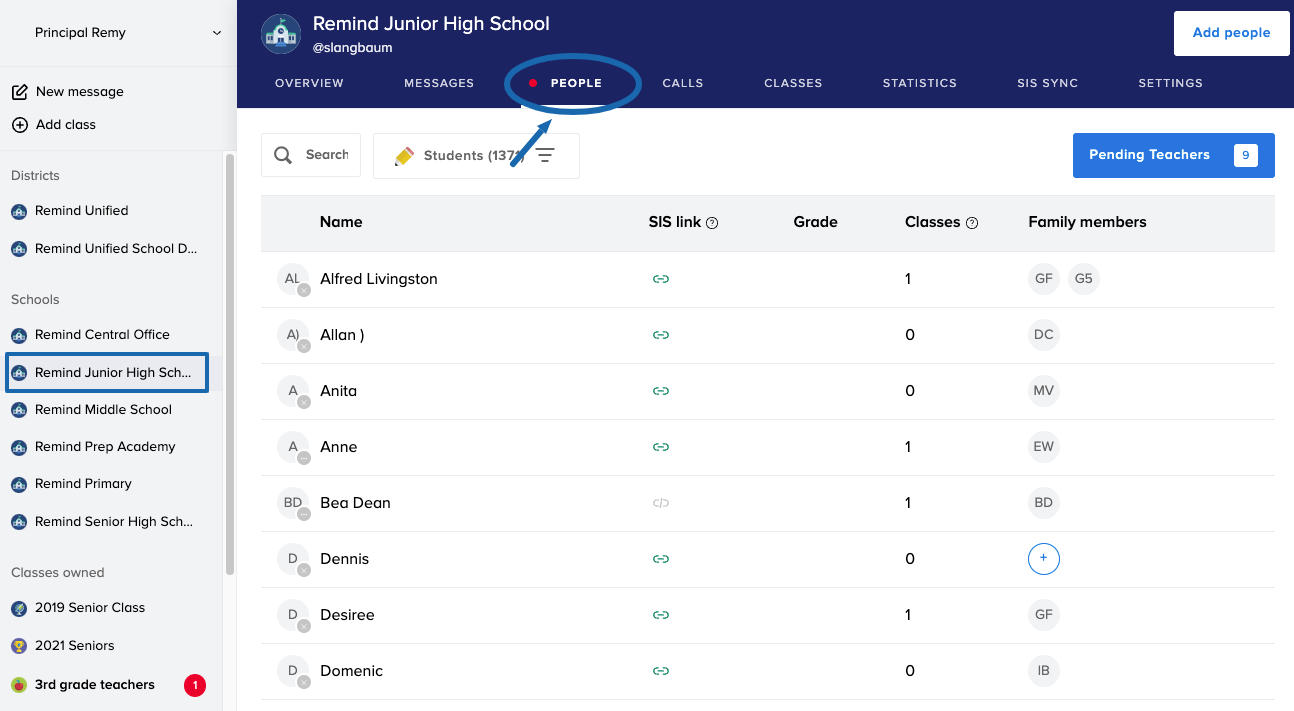
- The People tab allows you to see and manage all participants in your school, and to take actions such as editing their information and removing them as necessary.
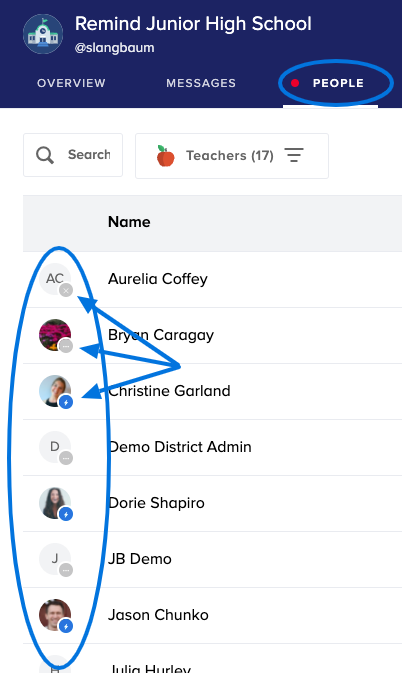
- If you have teacher-required approval activated to help keep your school account secure, any time you see a red dot on the People tab, it means that someone has sent you a teacher request. Check out our article to learn more about how to manage your pending teacher requests.
-
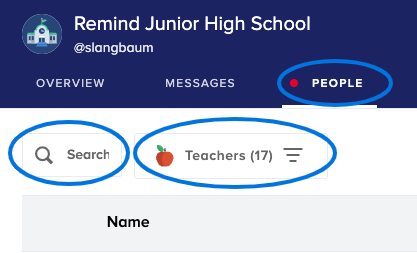
At the top of the page, you can search for anyone in your school by clicking in the search box
 .
.
-
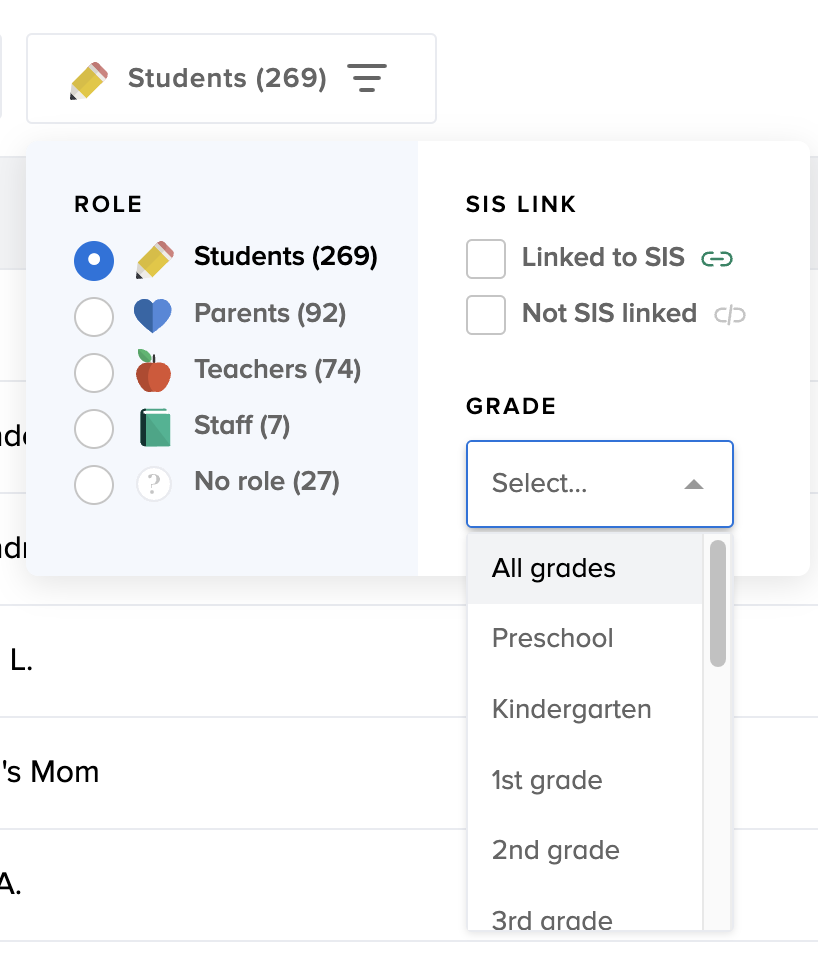
Next to the search box is where you can click the filter icon
 to view the list of school participants by role: students, parents, teachers, staff, or no role. You can also choose to see people linked to your school via SIS Sync rostering
  , people not SIS-linked
 , and/or filter students by grade. Note: you will only see students by grade if your school has SIS Sync rostered and included this information.
-
From each screen, filtered by role, you can see more details about people on the list.
- Students or Parents page - View how many classes and family members are linked to each participants’ account.
- Teachers page - Take a look at the date your teachers sent their last announcement as well as the total number of classes that are connected to their account.
- Staff page - Review the list of participants who have the ability to send messages to anyone in your school.
- No role page - Look over the number of classes connected to participants who do not yet have a role in your school. You can easily assign them a role.
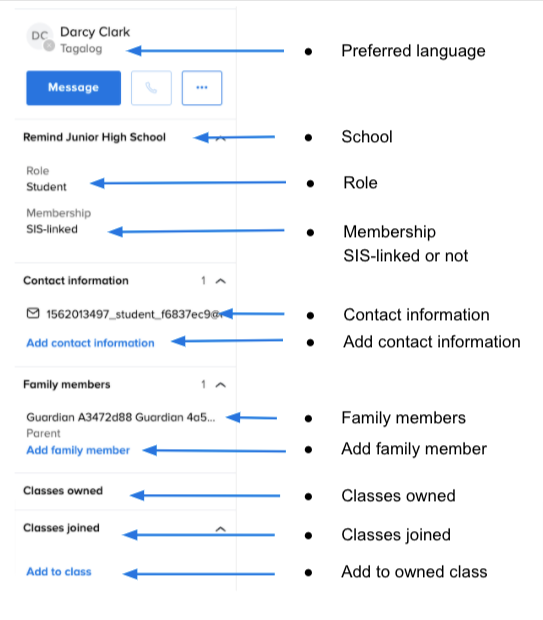
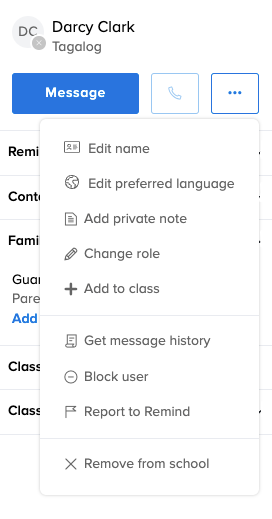
- When you click on a participant's name, you’re able to see more information about, and make any necessary updates to, their Remind account, such as editing or adding contact information, and connecting family members.
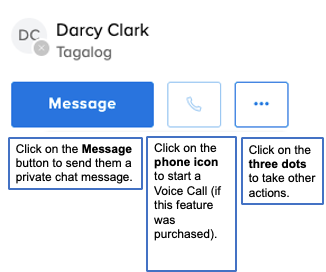
- At the top of the profile menu, you can take three actions:
|
Click on the three dots to take actions on a person’s account.
|
- From the People tab you can also see how school members receive your messages (by phone or email) as indicated by the small circle below the initials or profile picture, to the left of each person’s name.
Return to top of page Return to School admin dashboard
School Calls
This tab will only show for organizations that have purchased Voice Calls.
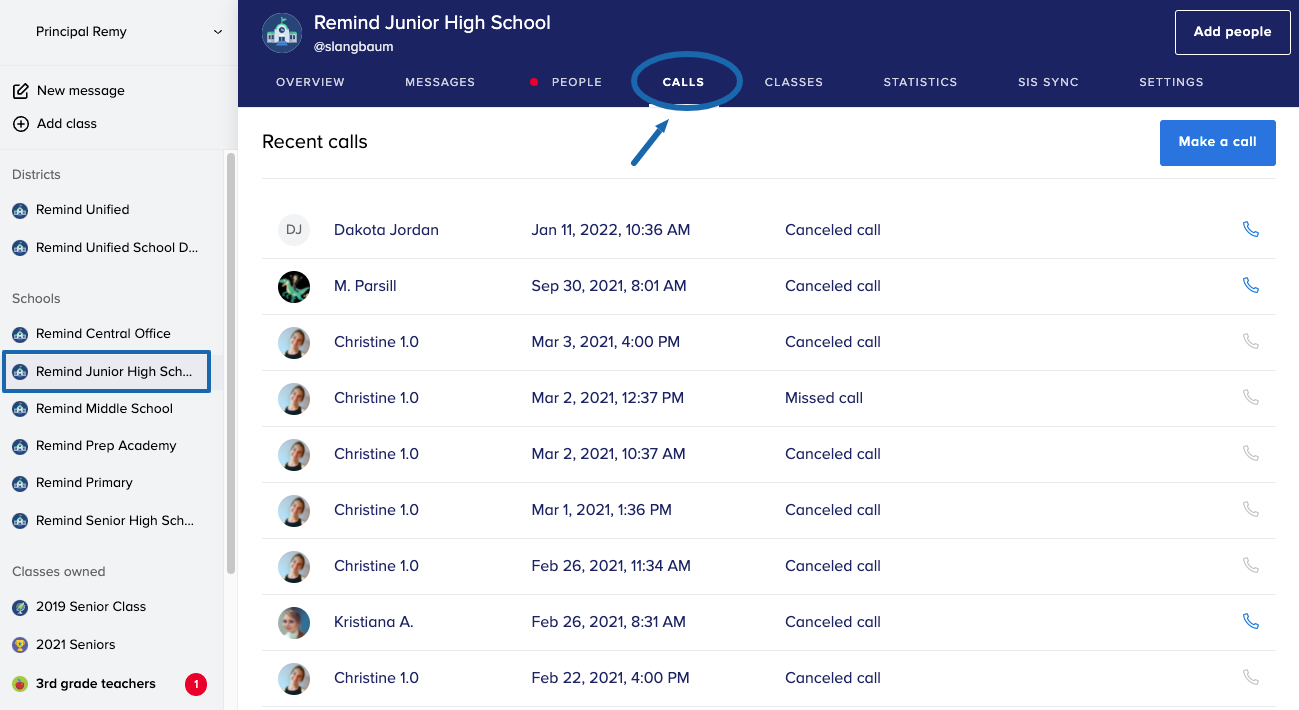
- The Calls tab shows a log of recent calls you've made and received with your Remind account.
- You can click on the Make a call button to initiate a new voice call, or click on the phone icon to call someone back.
- For more information, read the article: How do I make a Voice Call?.
Return to top of page Return to School admin dashboard
School Classes
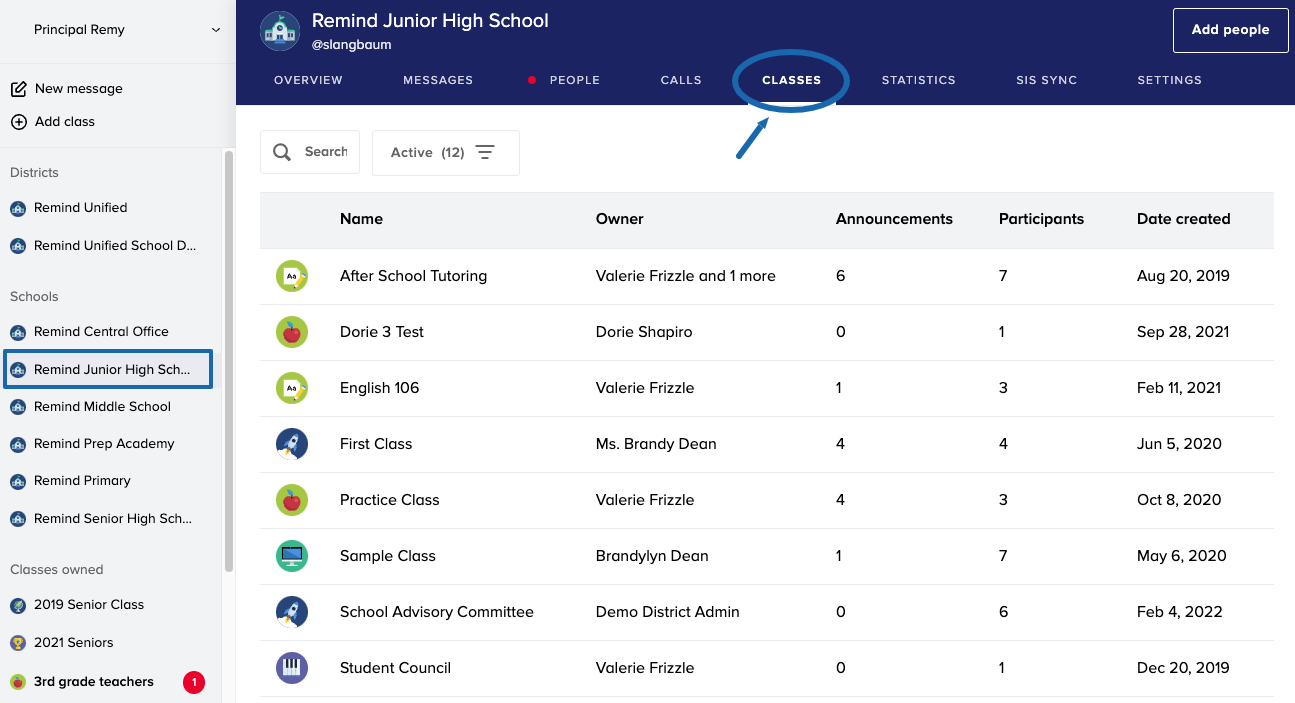
- In the Classes tab, you'll see all of the classes linked to your school.
- Information on classes include: the main owner of the class, how many class-wide announcements have been sent, how many participants are in each class, and when each class was created.
- Click on the Name header to switch viewing from A-Z to Z-A order.
-
At the top of the page you can Search
 for classes by name.
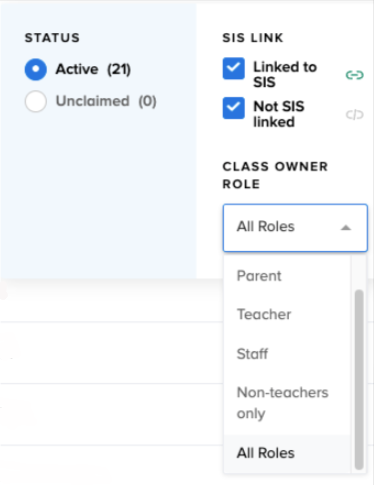
- Click the filter icon
 to view classes in different categories:
- Linked to SIS, or Not SIS linked
- By Role of class owners: all roles, student, parent, teacher, staff, and non-teachers only.
- The default status view for classes is Active, but if you have rostered classes, you can click on Unclaimed to view any classes that teachers have not yet claimed.
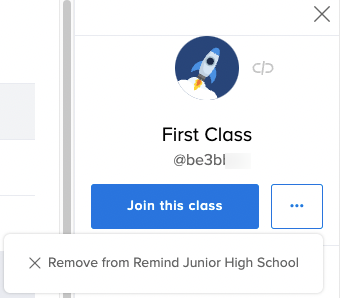
- When you click on the three dots, you can remove the class from your school.
- Learn about how you can bulk archive or remove classes from your school.
- You have the ability to make yourself an owner of any class in a school where you are an admin.
Return to top of page Return to School admin dashboard
School Statistics
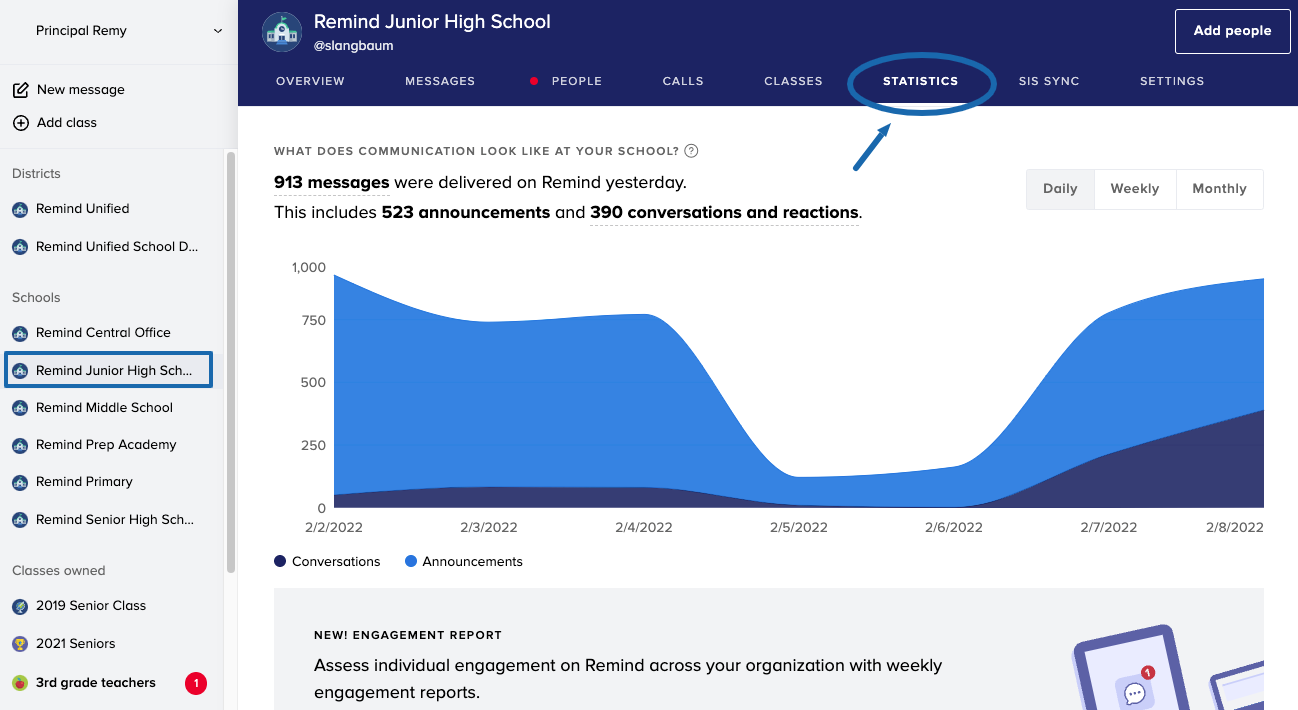
- The Statistics tab helps you monitor how your school's engagement has changed over time, which you can adjust to view by day, week, or month. To learn more about engagement information, check out this article: Community Engagement Statistics.
- The Engagement Report section gives you the ability to Download a report for everyone in your community. Information in the report includes: a list of all the classes each person is enrolled in, the number of messages each person has sent and received, and so much more! You can create your own filters and/or pivots tables to look at the information that is most important to you. There is a link to this helpful guide right in the dashboard to learn more about engagement reports.
Return to top of page Return to School admin dashboard
School SIS Sync
This tab will only show for organizations that have purchased SIS Sync rostering.
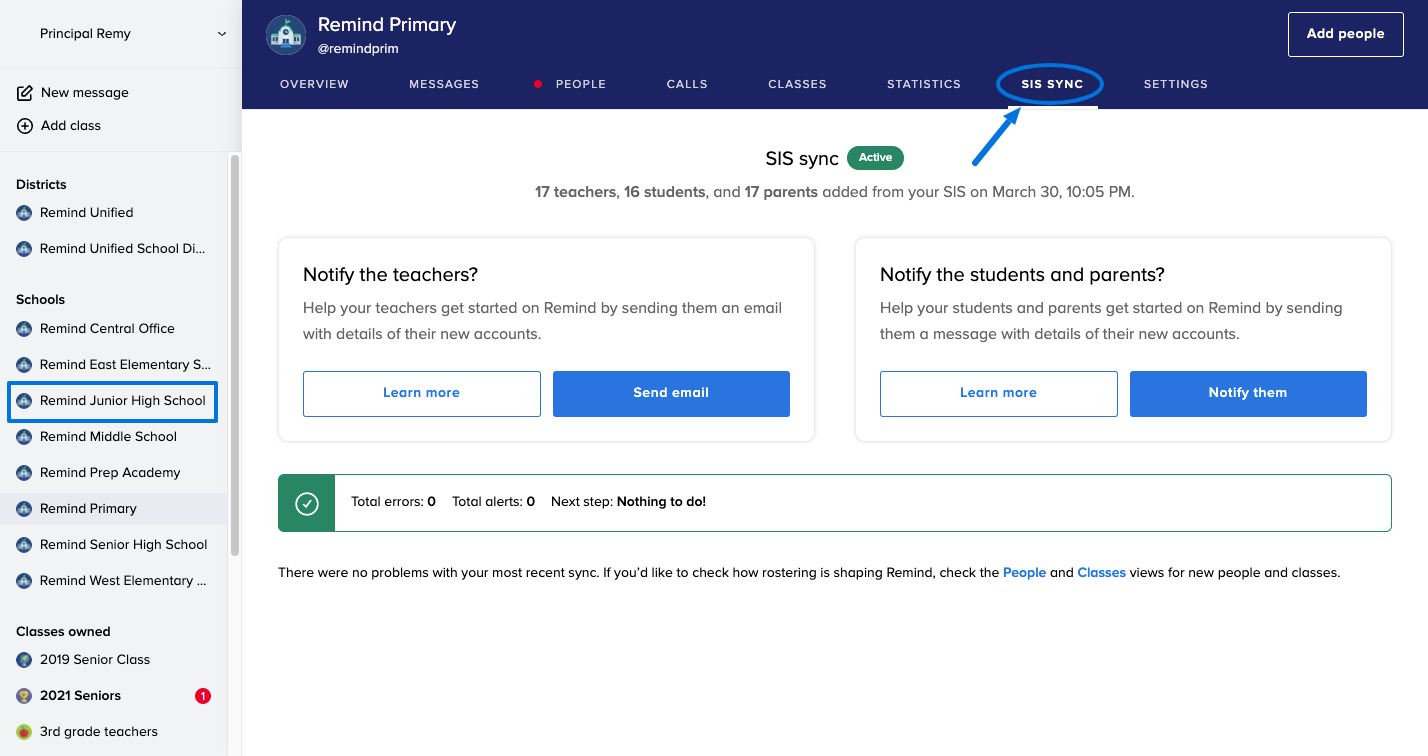
- If you've chosen to roster via CSV or API sync, you can view your school's rostering status on the SIS Sync tab. SIS Sync rostering is initiated and managed from the district's SIS Sync tab.
- When the SIS Sync rostering process is complete, this tab is where you'll go to send SIS rostering notifications to ask teachers to claim their classes, and notify students and parents of their newly-created rostered account.
Return to top of page Return to School admin dashboard
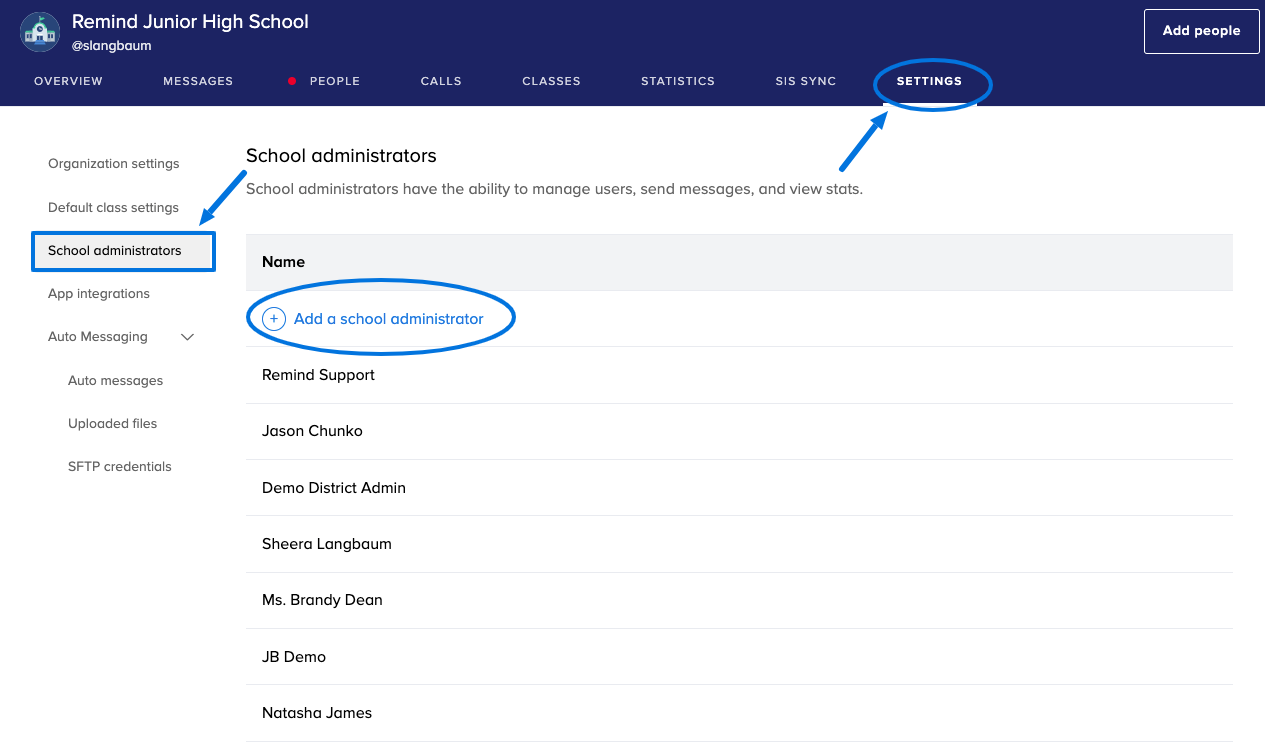
School Settings
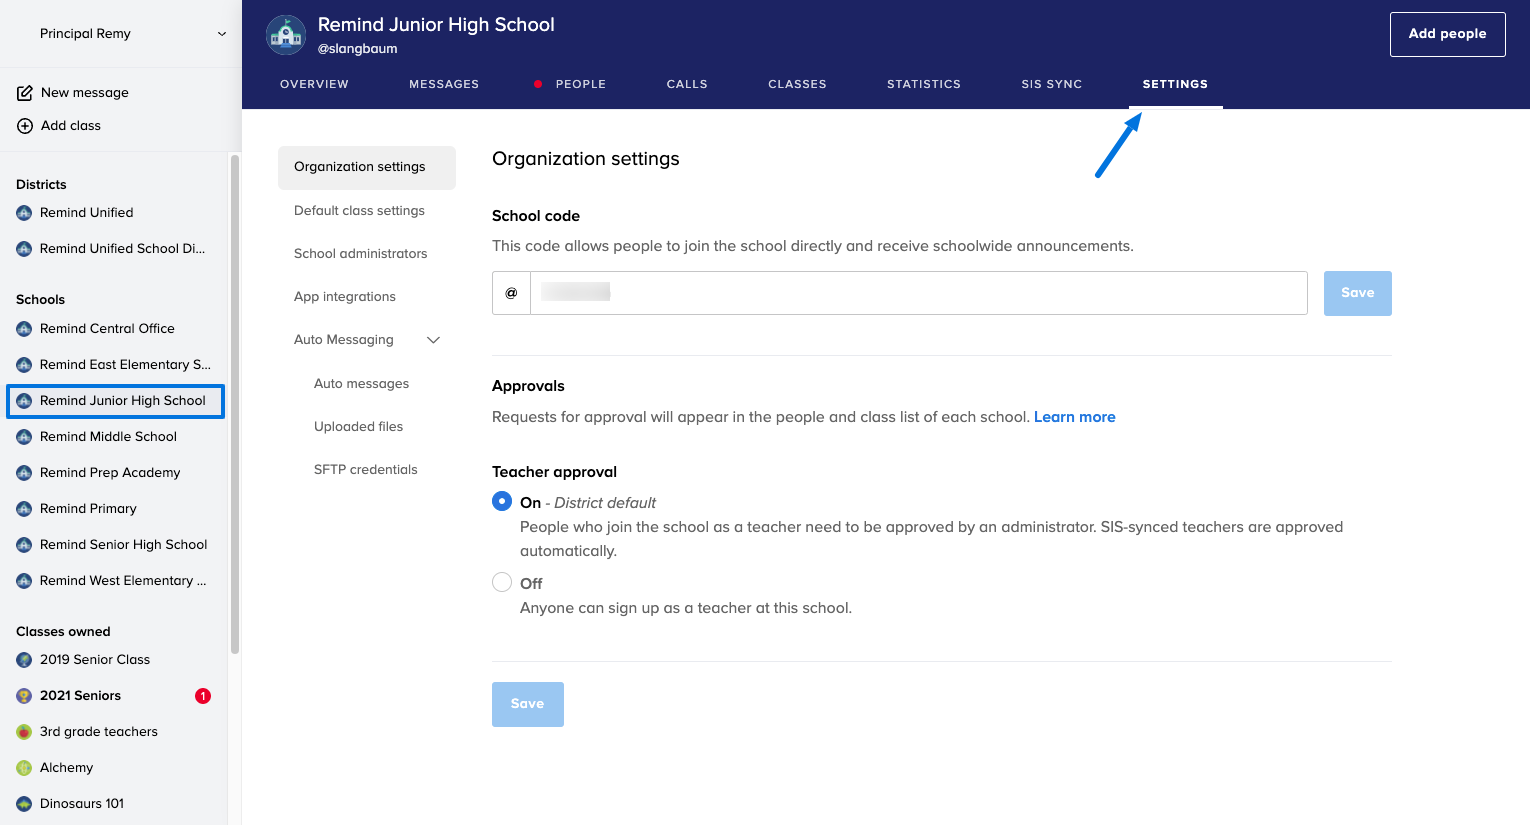
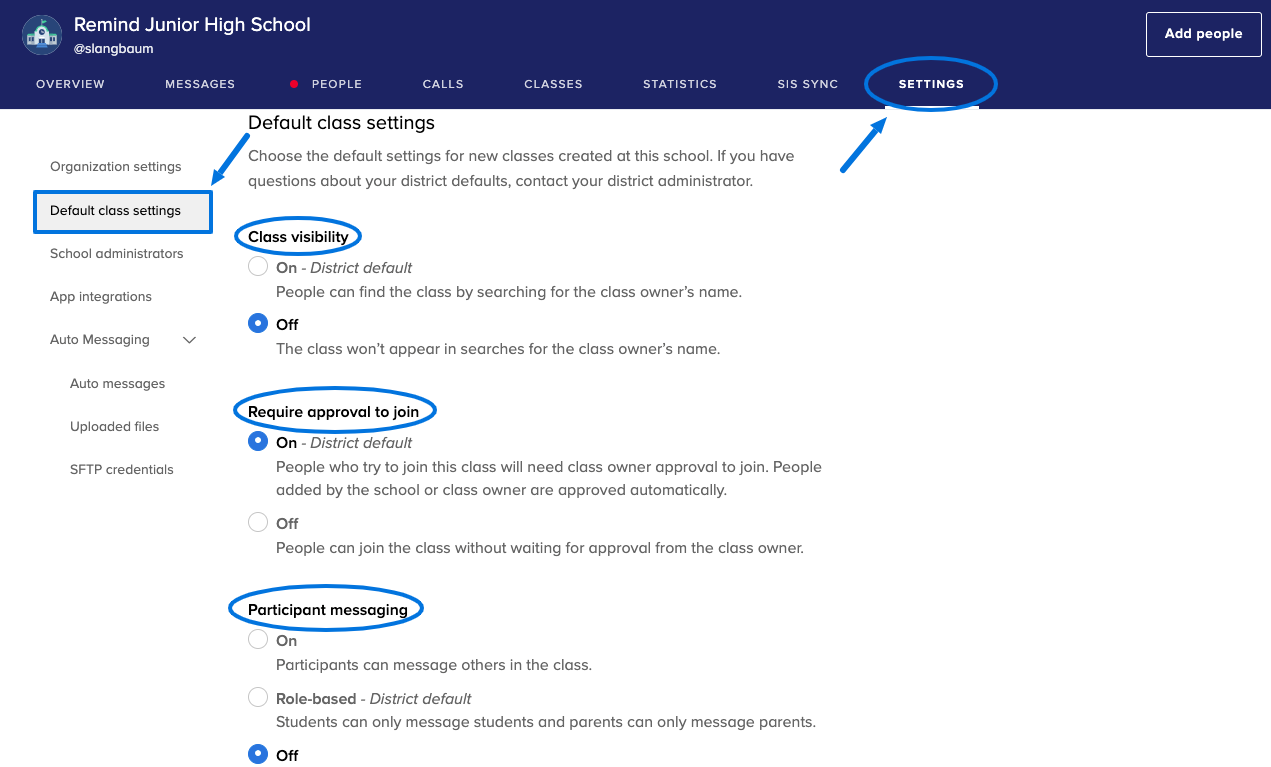
- In the Settings tab, you can set and control various school-wide features.
-
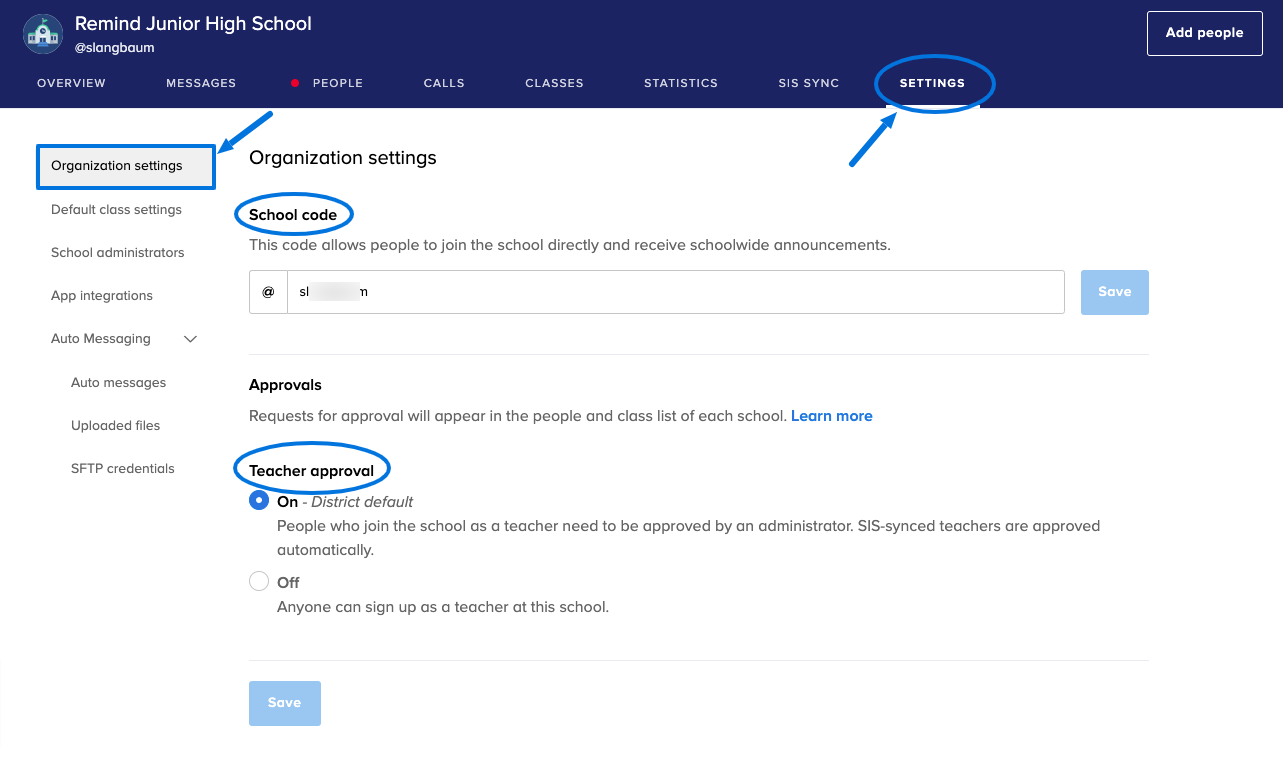
Go to Organization settings to view or change your school code, or to view and make changes to your Approval settings.
- When teacher approval is On (the default setting), this requires you to review pending teacher requests from the People tab. Off means that any teacher can join your school.
- We recommend keeping teacher approval on to help make your organization account more secure.
- In Default class settings you can set the default class settings for all new classes created for your school. Please note that class owners can override these defaults to best fit the needs of their class.
-
Via the School administrators section, you can add or remove school administrators.
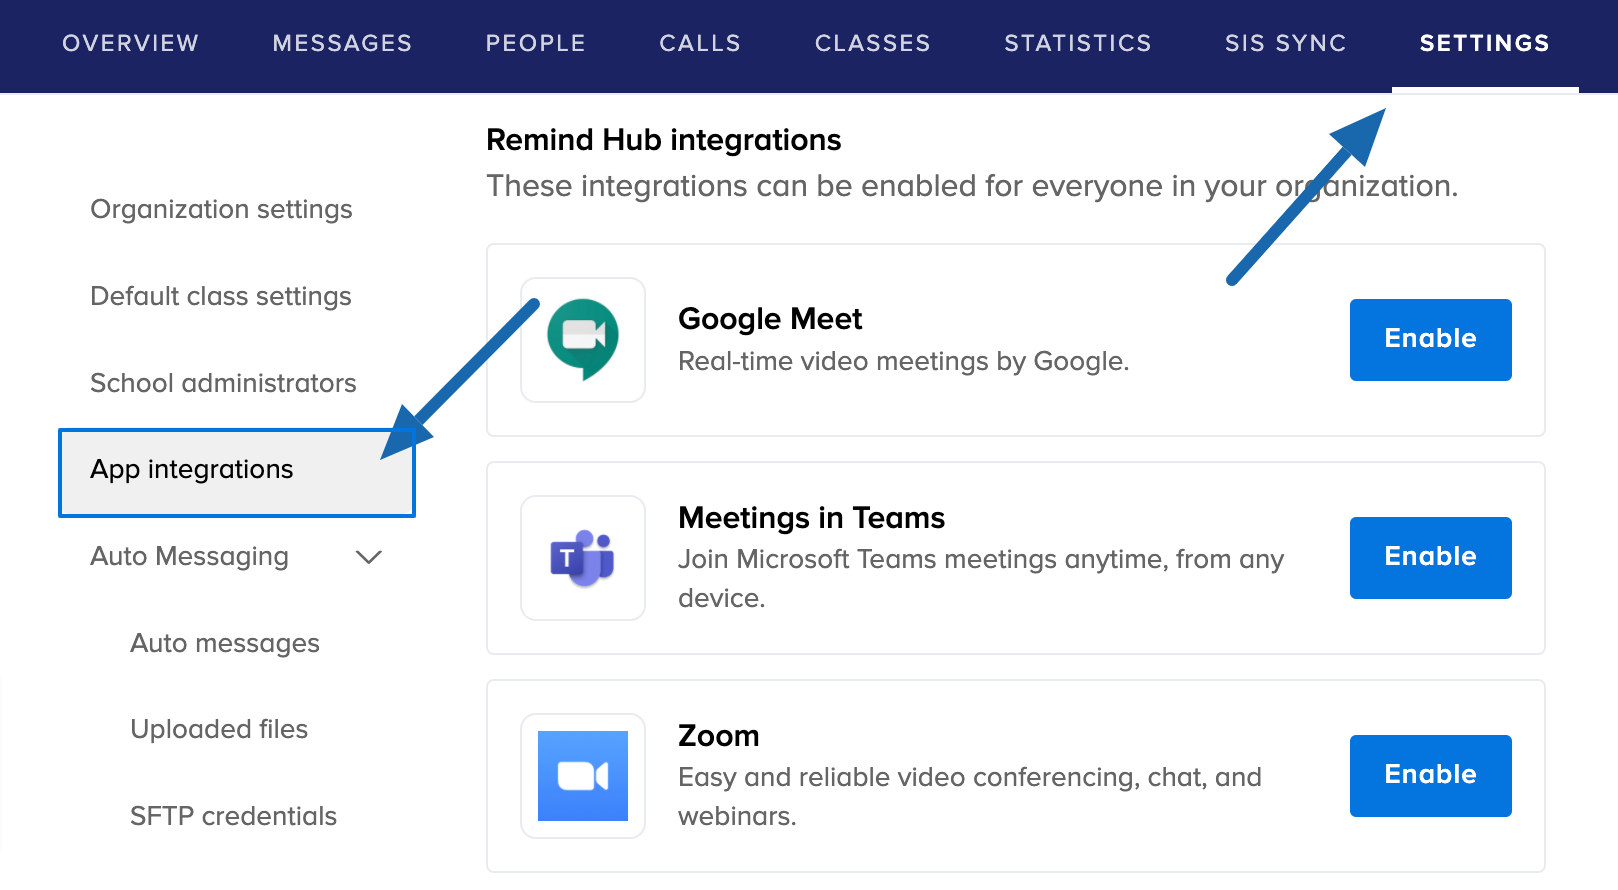
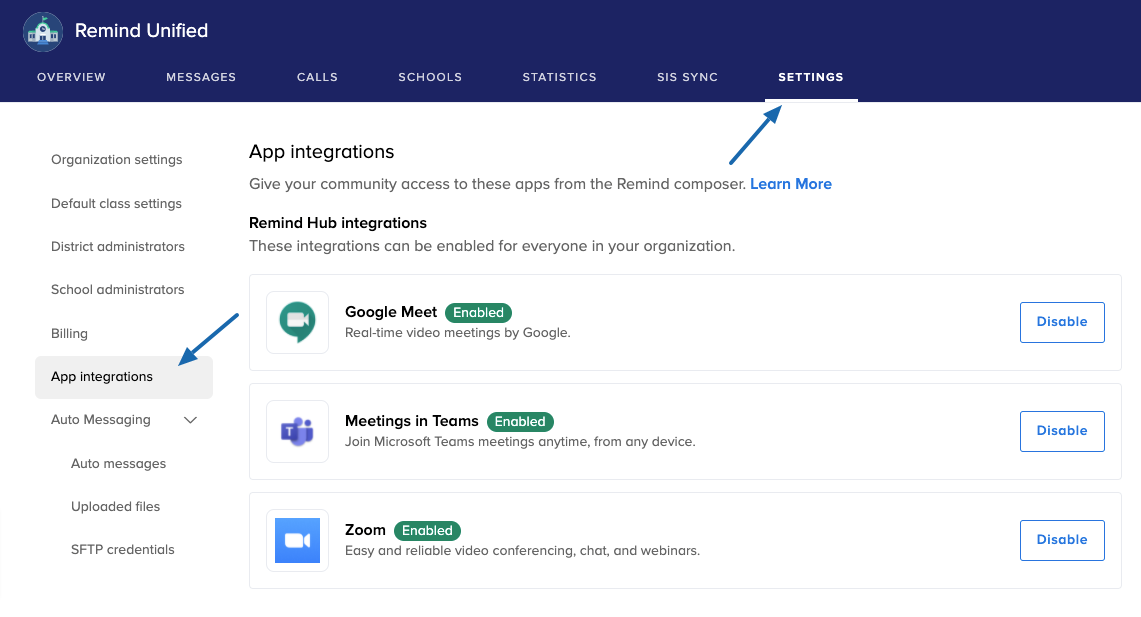
- If you are interested in setting up video integrations to allow your teachers to utilize Google Meet, Meeting in Teams, and/or Zoom, this can be done in the App integrations section.
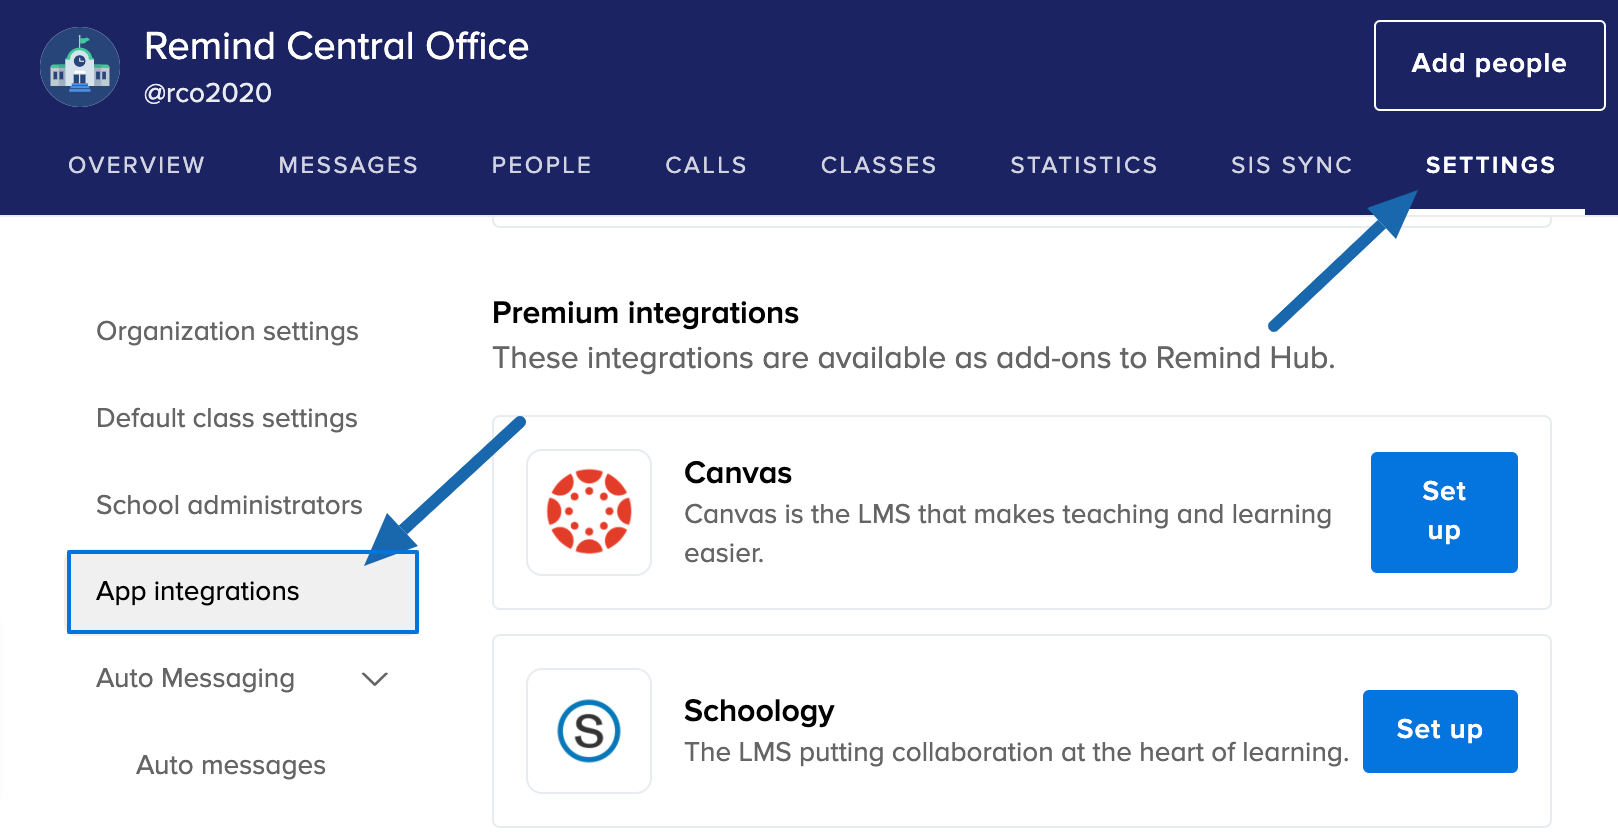
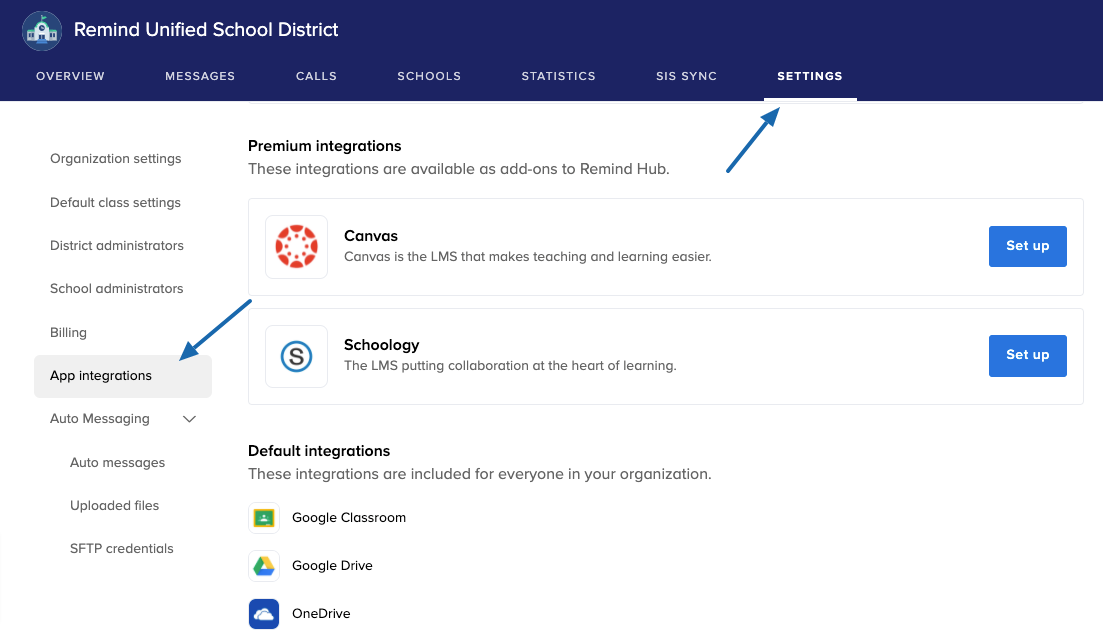
- If your organization has purchased LMS integration for Canvas or Schoology, you would use the App integrations section to activate them.
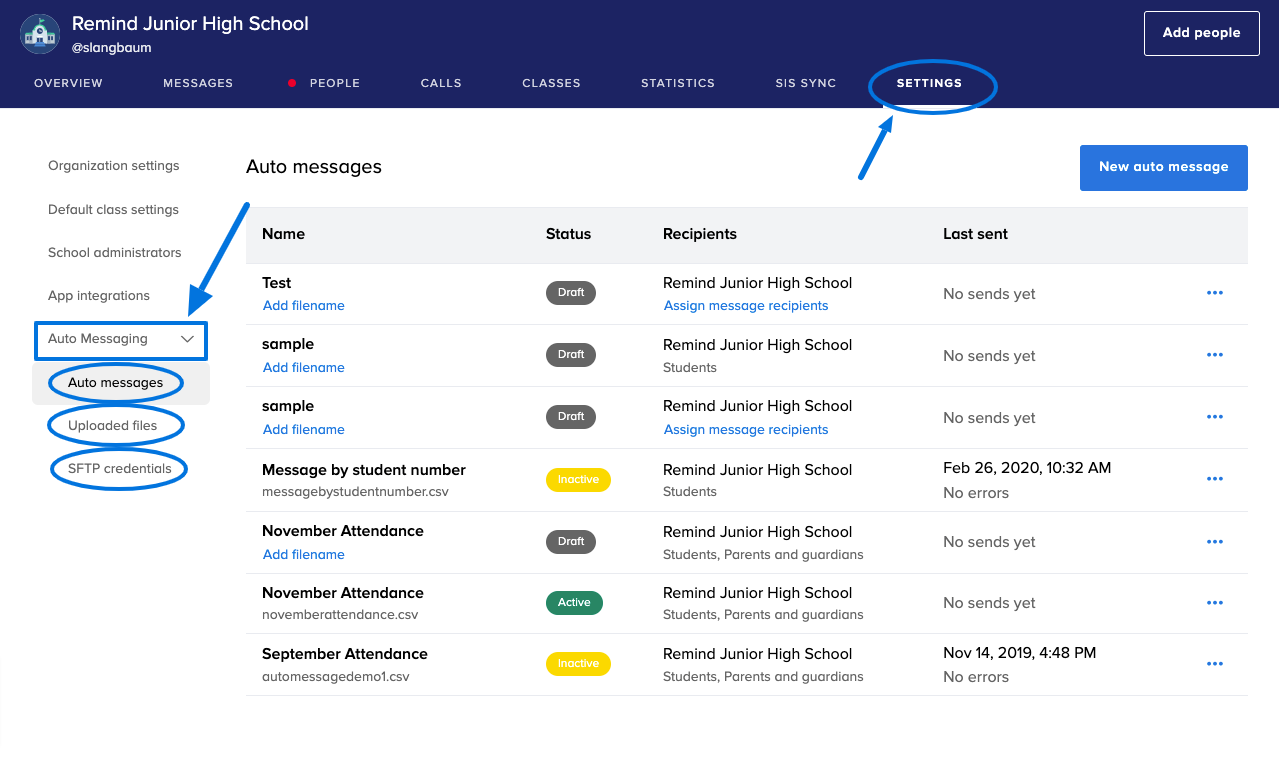
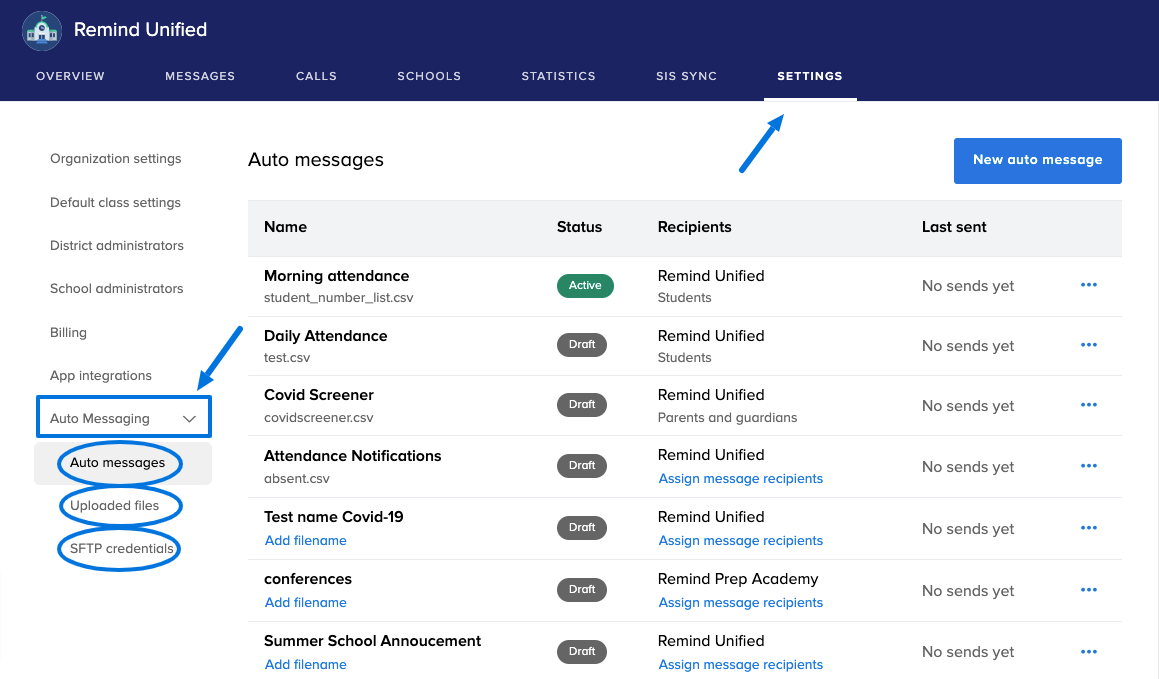
- If you have purchased the Auto messaging premium feature, it is also located here. You can set up your Auto messages, Upload your files, and create the necessary SFTP credentials. To learn more about auto messages, please view this article: How can I create and send auto messages?
Return to top of page Return to School admin dashboard
District admin dashboard
The district dashboard provides an overview of all schools and allows you access to district-wide statistics and settings. You also have the ability to drill down into any school to gain more insight (see School Dashboard). District dashboards are available only to district administrators and include the following tabs:
District Overview
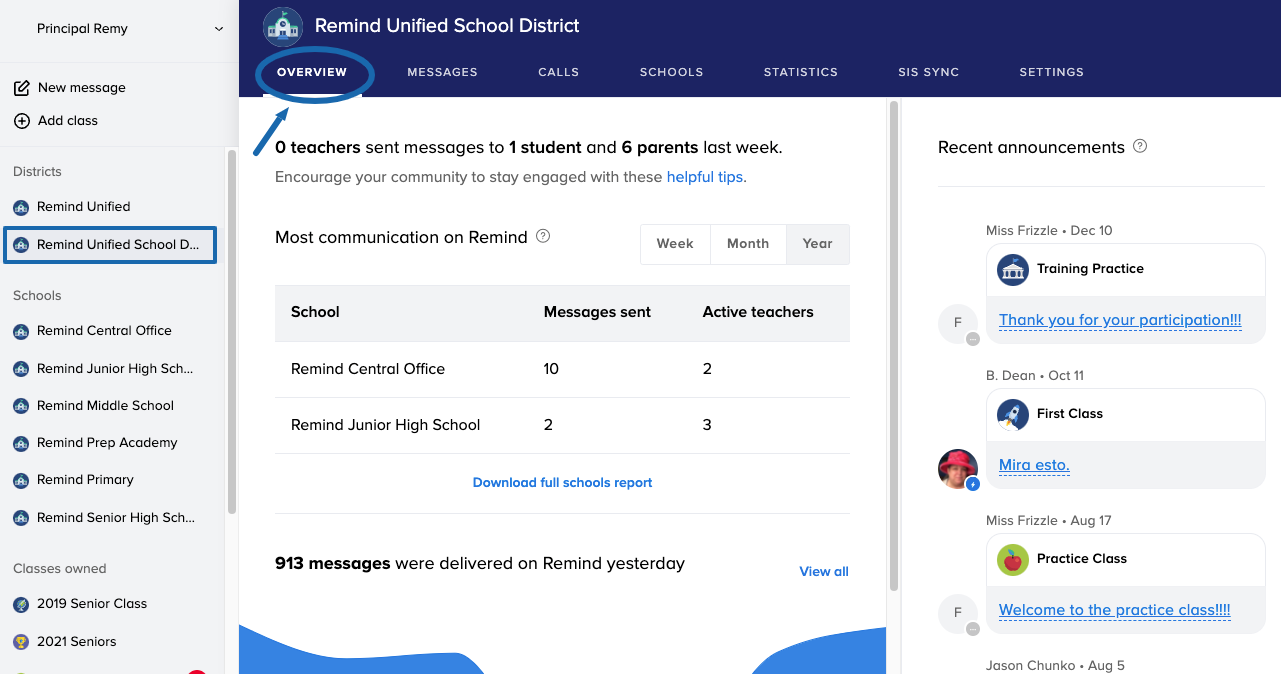
- The Overview tab includes at-a-glance statistics to help you understand how your district communicated in the last week, month, or year.
- This tab lists the schools who have communicated the most along with the option to Download [the] full schools report. This report includes a list of all of your schools, the number of active teachers, the total number of messages and announcements sent as well as the number of conversation chats and reactions your teachers have sent.This data is provided for the last week, month, and twelve months.
- On the right you can see Recent announcements that your admin/teachers/staff have sent.
Return to top of page Return to District admin dashboard
District Messages
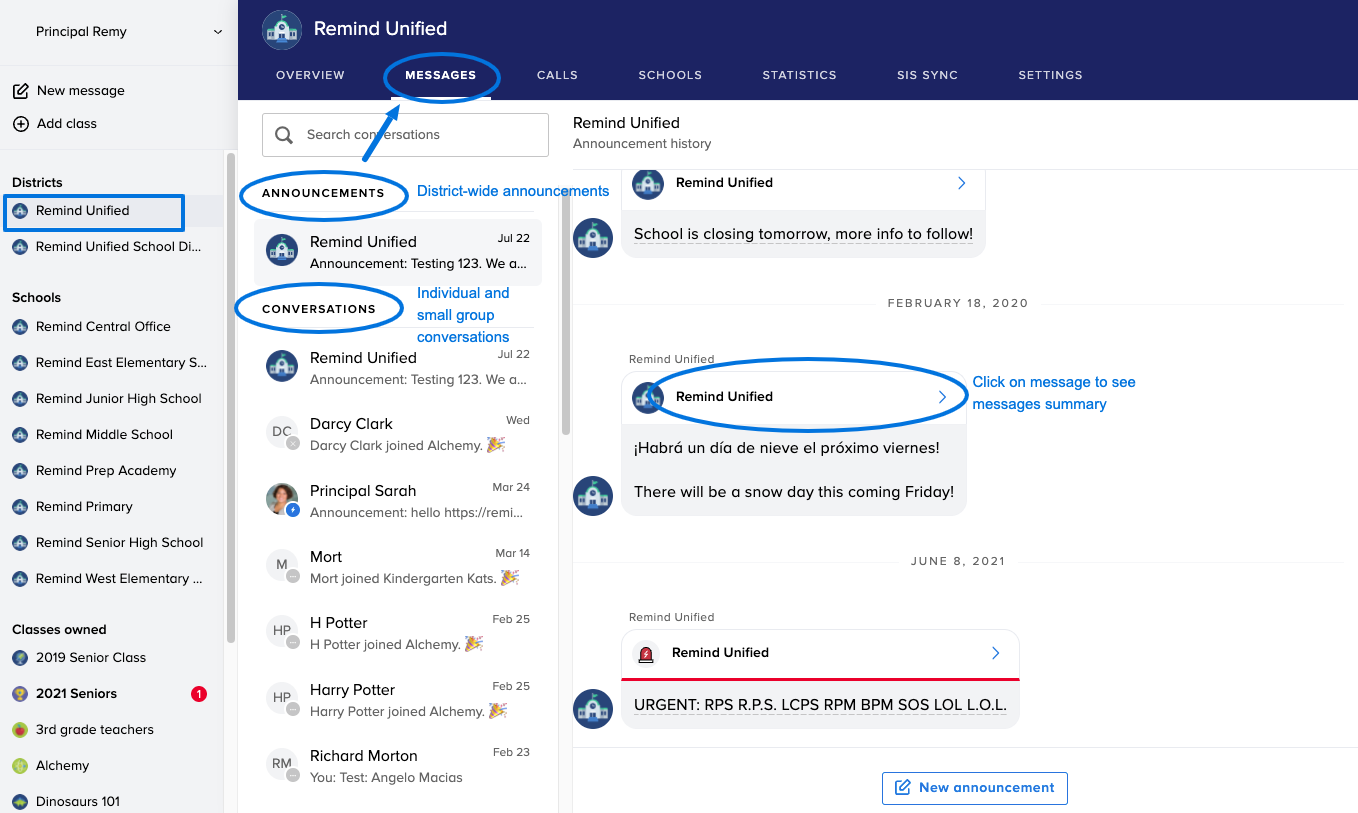
- The Messages tab shows streams of information flowing between you and your community.
- Announcements shows a record of district-wide and role-based announcements that have been sent and by whom.
- In the Conversations section, you can click on any teacher, student, parent, or group conversation to see the stream of messages sent and received.
- You can click on any announcement sent to see the message delivery summary and learn how many people have received and read that message.
Return to top of page Return to District admin dashboard
District Calls
This tab will only show for organizations that have purchased Voice Calls.
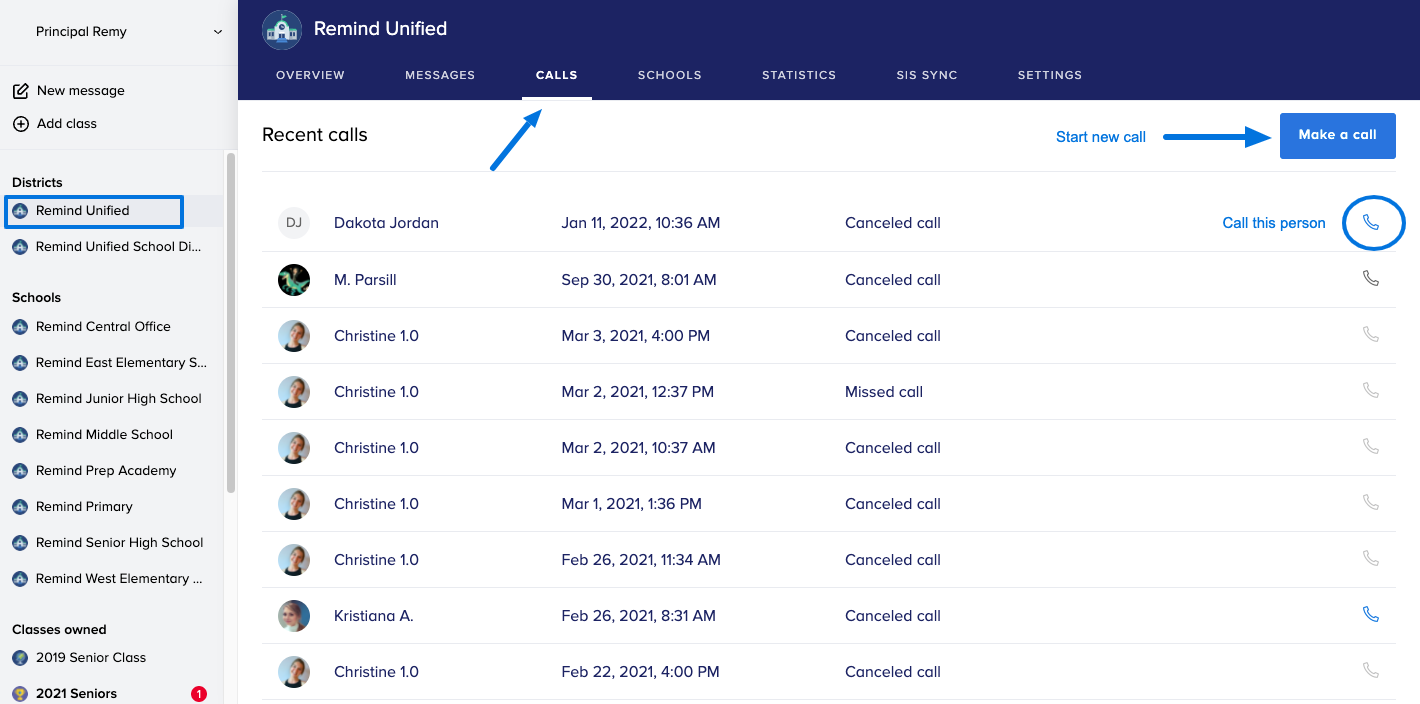
- The Calls tab includes a log of Recent calls you've made and received within your Remind account.
- You can click on the Make a call button to initiate a new voice call, or click on the phone icon to call someone back.
- For more information, read the article: How do I make a Voice Call?
Return to top of page Return to District admin dashboard
District Schools
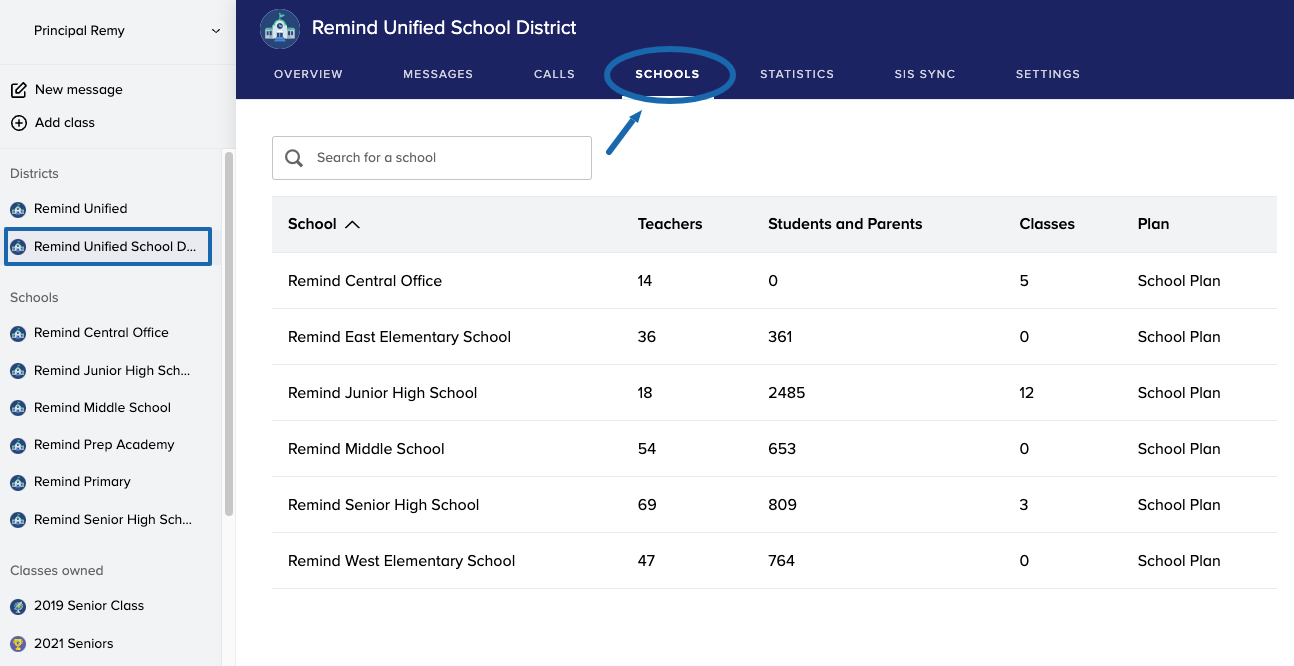
- From the Schools tab, you can see all schools connected to your district, even if they are not listed in your left navigation menu. You are actively connected to schools in the left navigation menu which means that you can add classes to and receive school-wide messages from those schools listed. You’re always able to send school-wide messages to any schools in your district that are part of Remind Hub. To add a school to your left navigation menu, simply join the school. You can see the number of teachers, students and parents as well as classes that populate each school. It also shows which schools in your district are included in your Remind Hub plan.
- View the names of each school in your district and use the arrow at the top to sort from A-Z or Z-A order.
- You can click on any school with a plan to access that school dashboard.
- To add a school to your left navigation menu, join the school.
Return to top of page Return to District admin dashboard
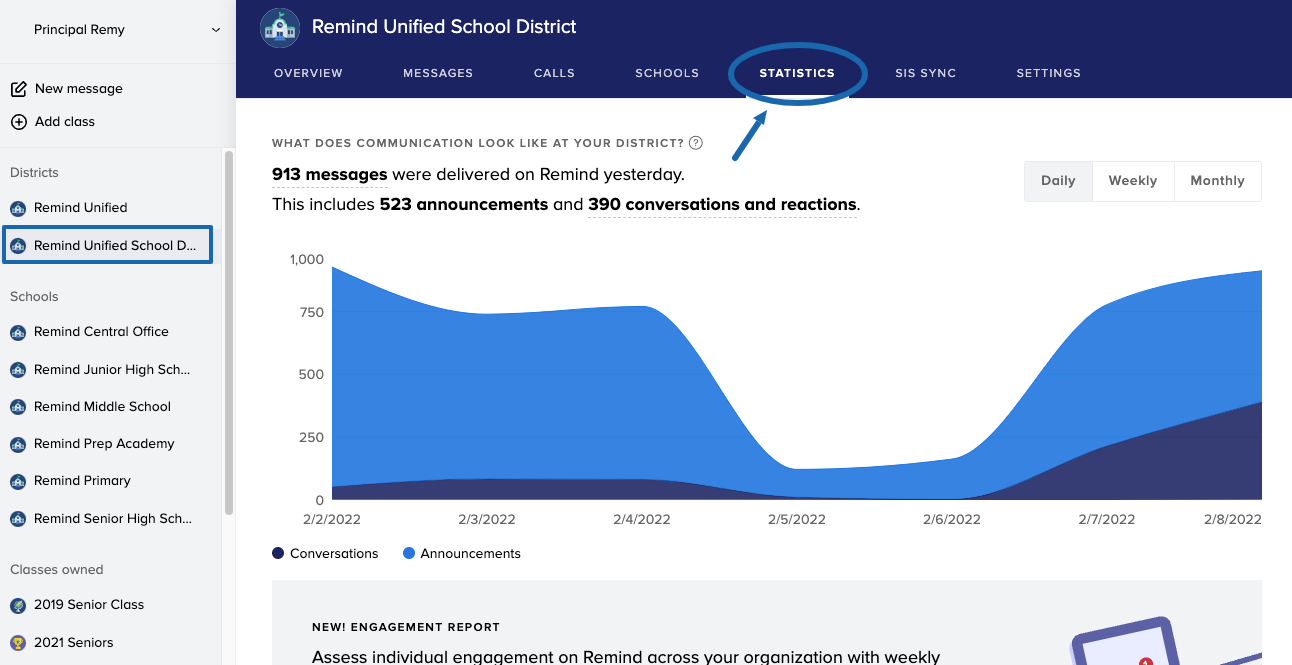
District Statistics
- The Statistics tab helps you monitor how your district's engagement has changed over time, which you can adjust to view by day, week, or month. To learn more about engagement information, check out this article: Community Engagement Statistics.
- The Engagement Report section gives you the ability to Download a report for everyone in your community. Information given includes all the classes each person is enrolled in, how many messages each person has sent and received, and so much more! You can create your own filters and/or pivots tables to look at the information that is most important to you. There is a link to this helpful guide right in the dashboard to learn more about engagement reports.
Return to top of page Return to District admin dashboard
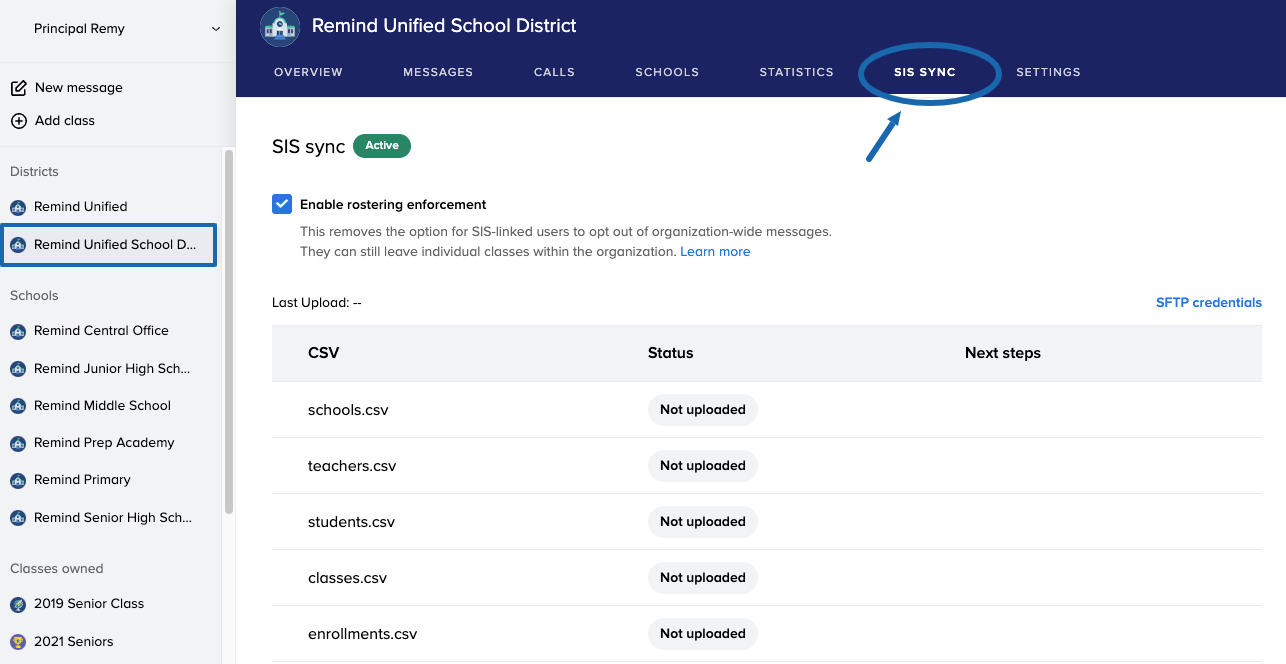
District SIS Sync
This tab will only show for organizations that have purchased SIS Sync rostering.
- If you've chosen to provision Remind accounts and classes for your community members via CSV or API sync, you'll be using your SIS Sync tab to initiate and manage rostering throughout the gated process.
- When the SIS sync rostering process is complete, you must send SIS rostering notifications from each school’sSIS Sync tab to ask teachers to claim their classes.
- To learn more about rostering, check out our article: What is rostering?
Return to top of page Return to District admin dashboard
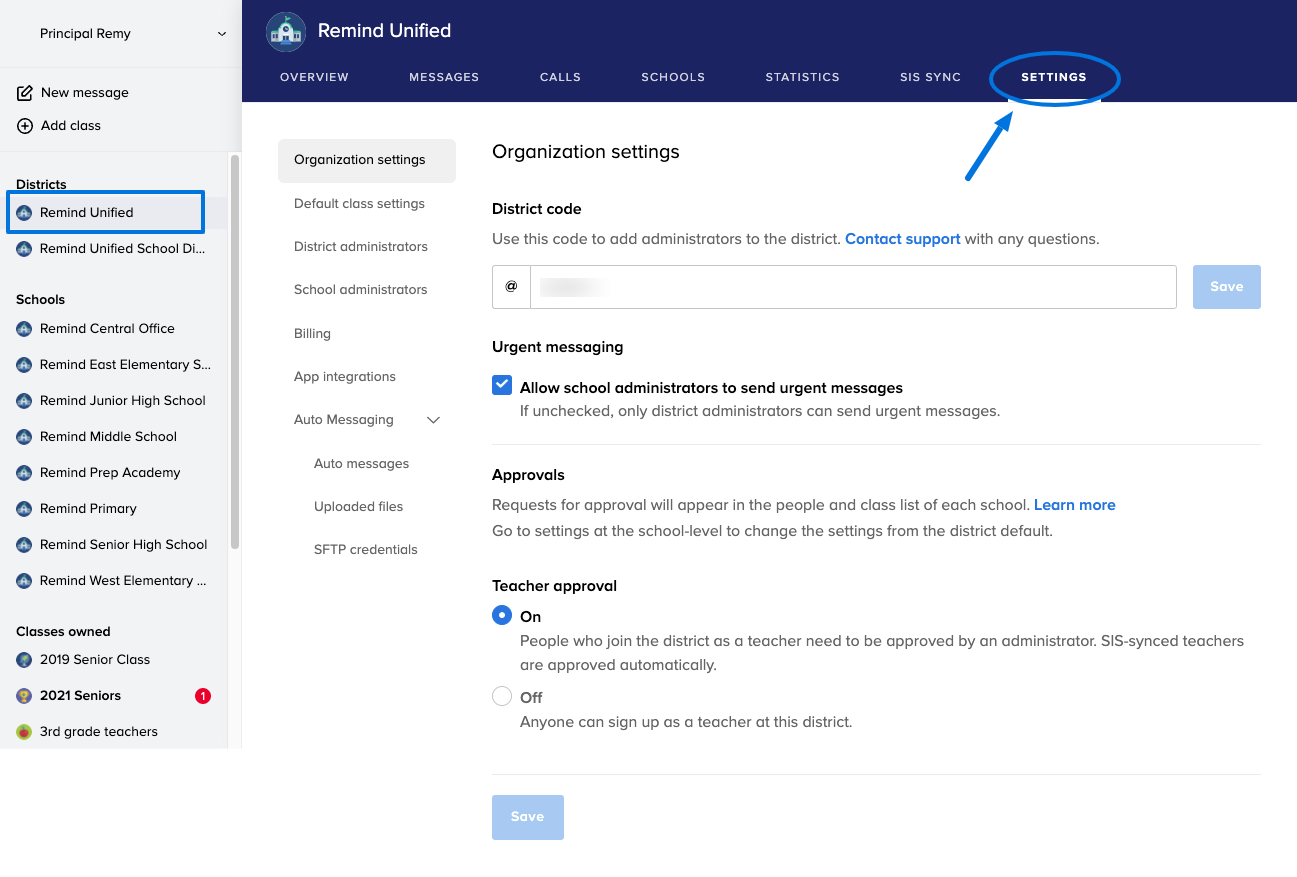
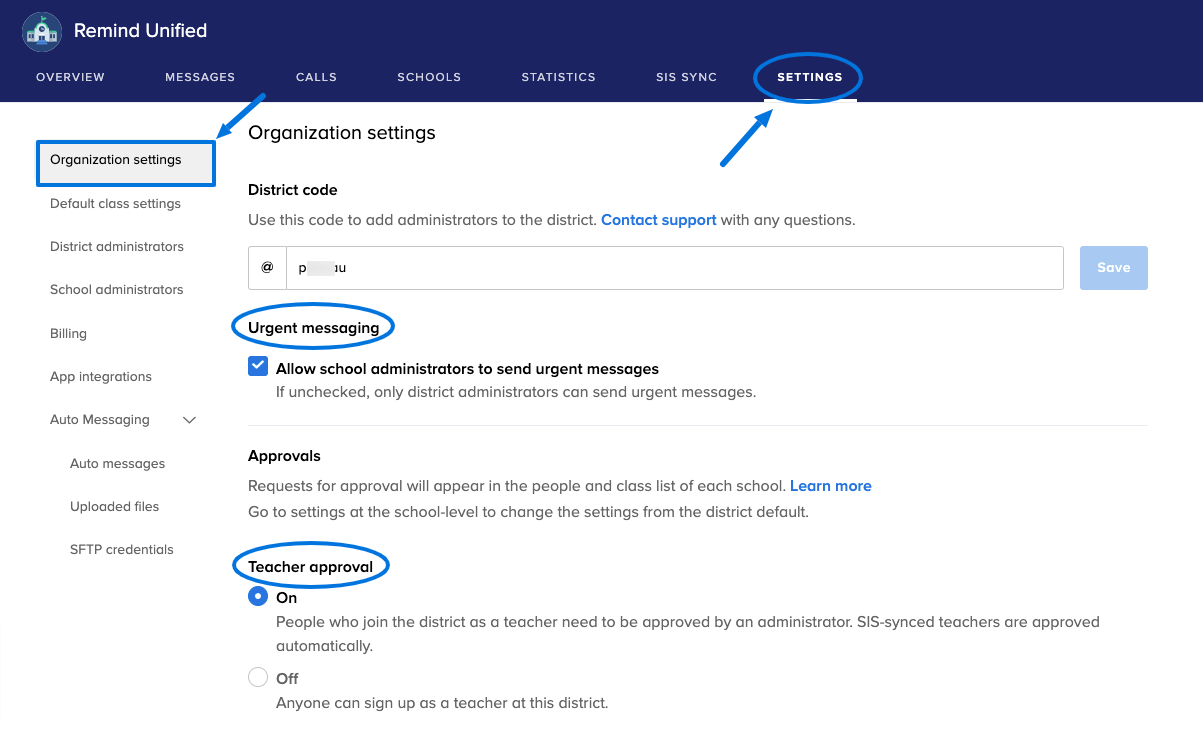
District Settings
- In the Settings tab, you can set and control various district-wide features.
-
Go to Organization settings to view and make changes to your Approvals settings.
- If you’ve purchased Urgent Messaging, you can control whether school administrators or only district administrators can use it. For more information, read our article: How do I send an urgent message?
- When Teacher approval is On (the default setting), this requires admin to review pending teacher requests from the School People tab. Off means that any teacher can join any school in your district. We recommend keeping teacher approval on, so your organization account is more secure. Please note that individual school administrators can override the district’s teacher approval setting.
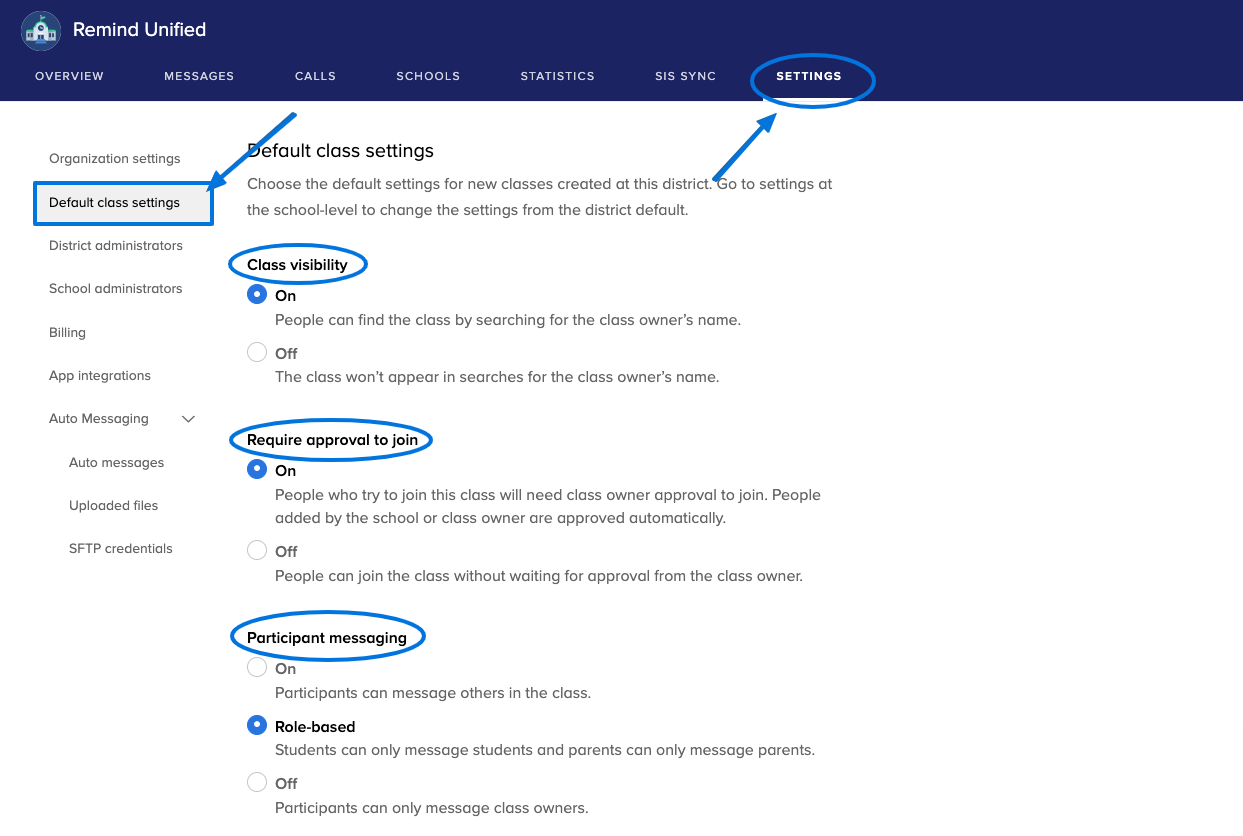
- In Default class settings, you can set the default class settings for all new classes created for your schools. Please note that class owners can override these defaults to best fit the needs of their class.
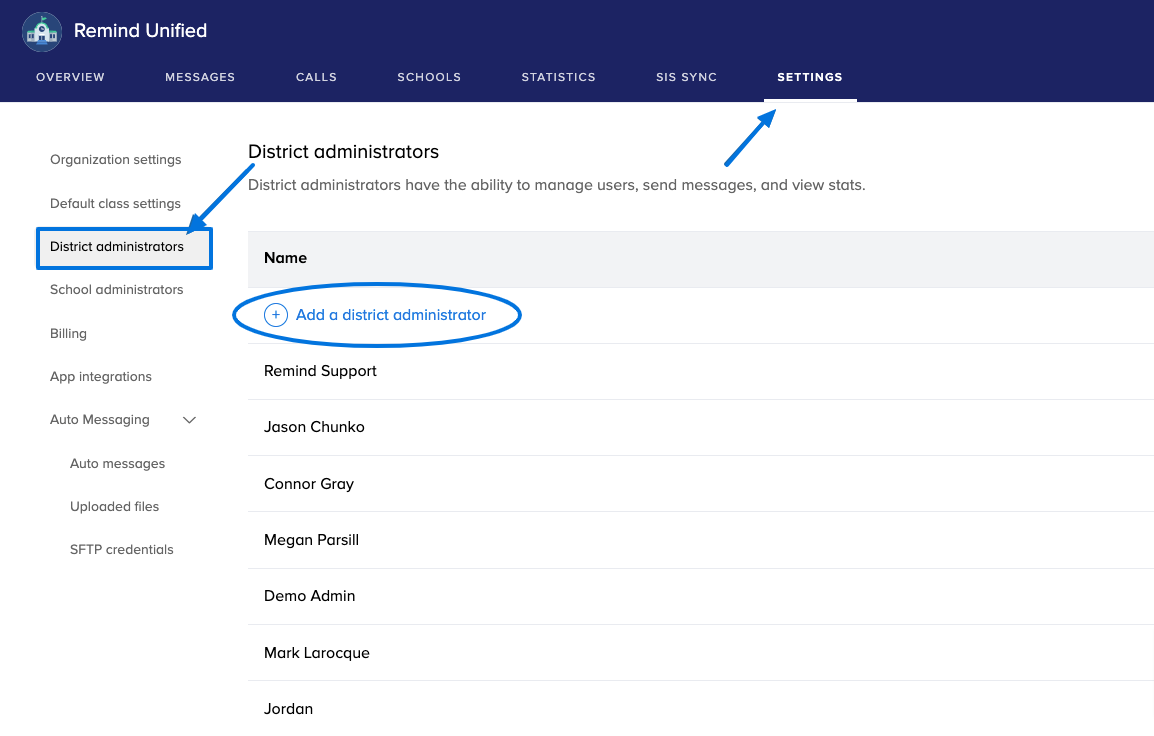
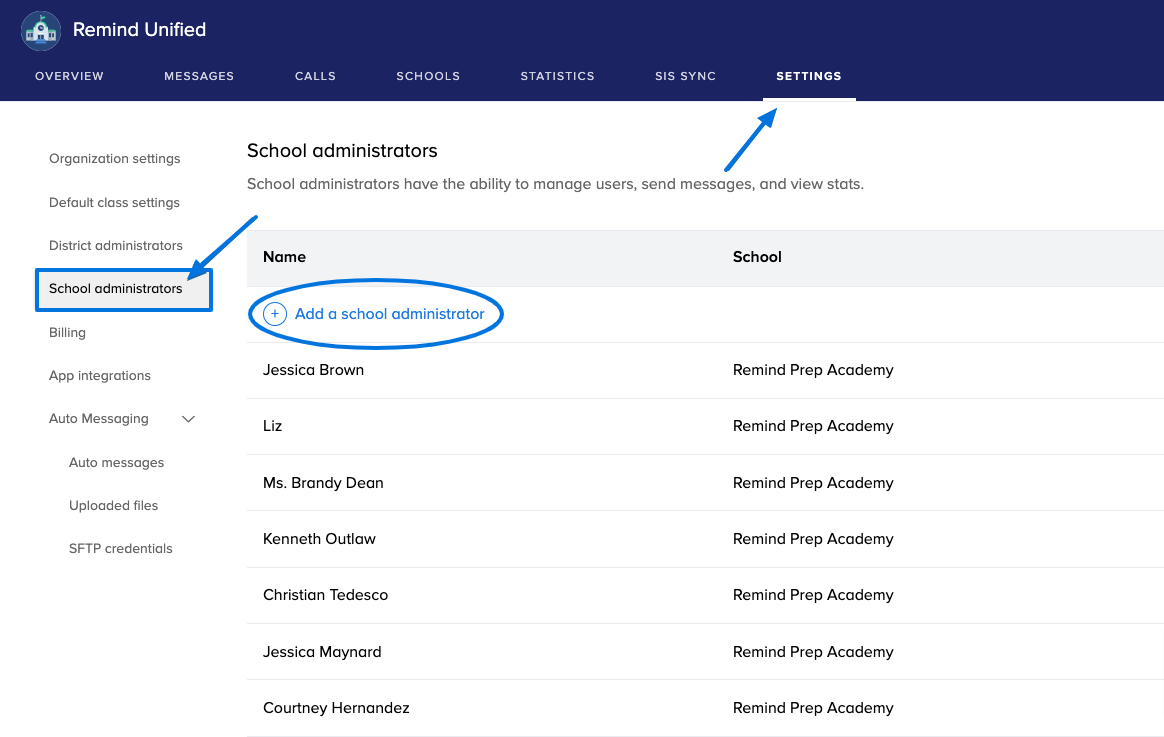
- Via the District administrators section and the School administrators section, you can add or remove administrators.
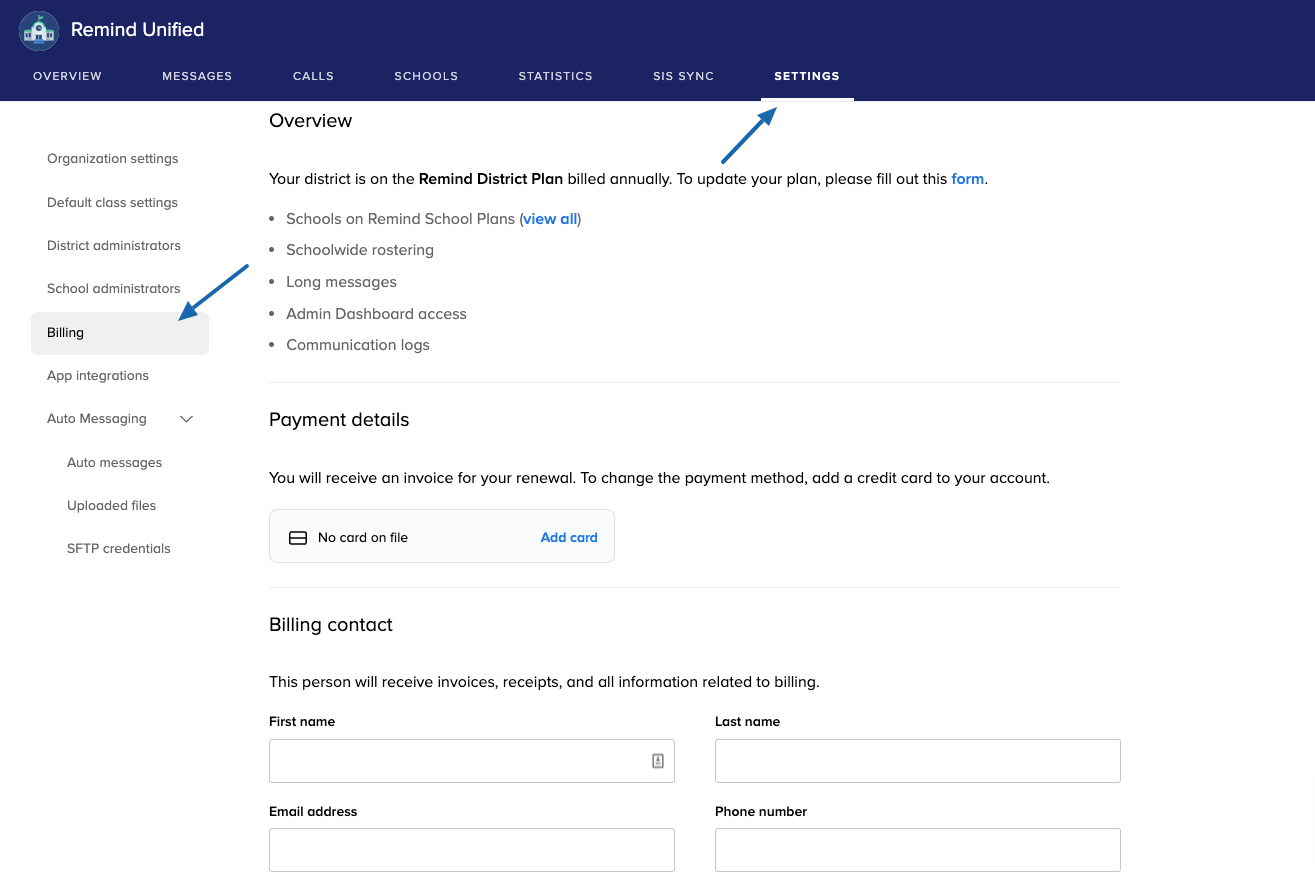
- The Billing section provides an overview of your features, allows you to change payment details (if paying by credit card) and provide/update billing contact information.
- If you’re interested in setting up video integrations to allow your teachers to utilize Google Meet, Meeting in Teams, and/or Zoom, you can enable them for your organization in the App integrations section.
- If your organization has purchased LMS integration for Canvas or Schoology, go to the App integrations section to activate them.
- If you’ve purchased Advanced messaging, the Auto messages feature is located in the Settings tab. You can set up your Auto messages, Upload your files, and create the necessary SFTP credentials to send customized messages to your students and parents. To learn more about auto messages, please view this article: How can I create and send auto messages?
Return to top of page Return to District admin dashboard


