For all Remind users.
Use our scheduling feature to plan Remind messages days, weeks, or months in advance. Scheduling can only be used for announcements. Messages are scheduled based on the time zone you've set for your computer or cell phone instead of the time you see on your computer or phone clock. As a result, if you plan to travel, you'll need to update your time zone before you schedule your message to ensure we deliver your message at the right time. View, edit, or delete a scheduled announcement at any time.
You cannot schedule role-based messages via the iOS or Android app.
This article contains the following sections:
Things to keep in mind
![]() Be sure to delete scheduled messages before you archive a class because they'll still get sent.
Be sure to delete scheduled messages before you archive a class because they'll still get sent.
![]() You cannot select a school or class if you select a district.
You cannot select a school or class if you select a district.
Schedule a message
Web
- Log in to your Remind account.
- Click New Message and select Message or Urgent Message.
- Choose the district, school(s), or class(es) you want to send the message to in the future, then click Continue. If you choose a district, you cannot also select a school or class.
- Compose your message.
- Click the clock icon
, select Today, and choose the future Date.
- Click Select and use the scroll bar to find and choose the future Time.
- Click Schedule.
The scheduled announcement will automatically appear at the bottom of your Messages dashboard.
iOS
You must have the latest Remind app to schedule messages at the district level.
- Open the Remind app.
- Tap New message.
- Select Announcement or Urgent message.
- Tap the district, school(s), or class(es) you want to schedule the message for. If you choose a district, you cannot also select a school or class.
- Tap Next on the bottom right.
- Compose your message.
- Tap the
clock icon.
- Scroll to select the date and time you want to send the message.
- Tap Set time.
- Tap Schedule.
- Click Send to confirm you want to schedule the message. The scheduled announcement will automatically appear at the top of your announcements.
Android
You must have the latest Remind app to schedule messages at the district level.
- Open the Remind app.
- Select a school, class, or district.
- Tap the compose icon on the bottom right.
- Select Announcement or Urgent message.
- Tap the district, school(s), or class(es) you want to schedule the message for. If you choose a district, you cannot also select a school or class.
- Compose your message.
- Tap the airplane clock icon.

- Scroll to select the date and time you want to send the message.
- Tap Schedule.

The scheduled announcement will automatically appear at the bottom of your announcements.
View, edit, or delete a scheduled message
Web
- Log in to your Remind account.
- Click on the district, school, or class with the scheduled announcement.
- Select the Messages tab.
- On the Announcements dashboard, click
scheduled announcement. The number shown will reflect the number of messages you scheduled.
- Move your cursor over the scheduled announcement and select
Edit to change it, or click the trashcan
to delete it.
If you scheduled the announcement at multiple schools or classes, you must edit or delete it from each one.
iOS
- Open the Remind app.
- Tap on the district, school, or class you scheduled the announcement for.
- Select Messages at the top.
- Under the Announcements heading, click on the school, class, or role-based group of people you scheduled the announcement to be sent to.
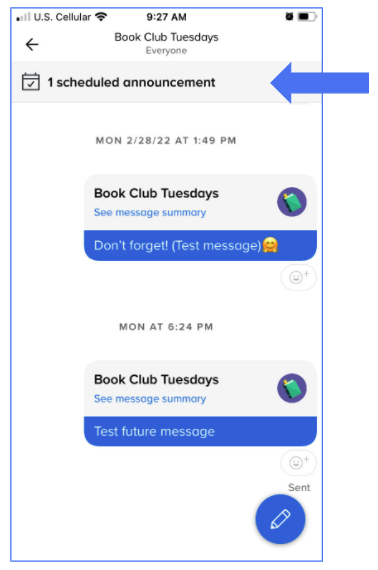
- Tap 1 scheduled announcement at the top of the message board.
- Tap on the scheduled message you wish to edit or delete.
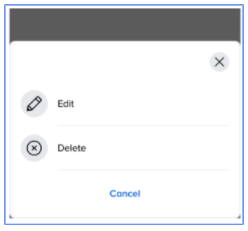
- Select Edit to modify the scheduled announcement, or tap Delete to remove it.
Android
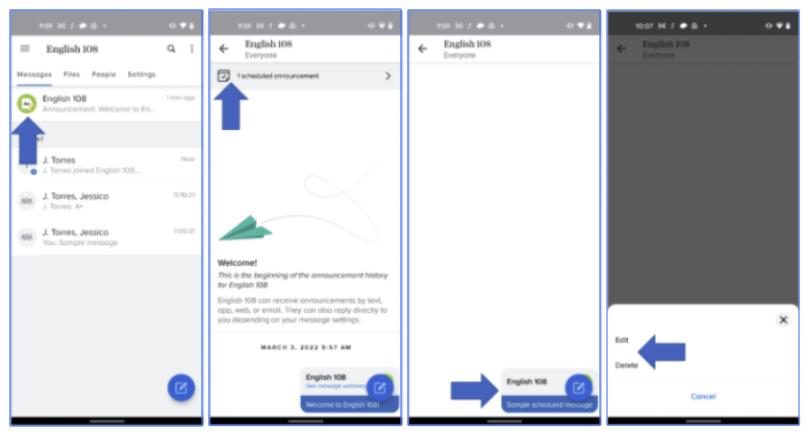
- Open the Remind app.
- Tap on the school or class you scheduled the announcement in.
- Select Messages at the top.
- Tap the Announcement section.
- Tap 1 scheduled announcement at the top.
- Note - The number shown will reflect the number of messages you’ve scheduled.
- Tap the scheduled message at the bottom.
- Select Edit or Delete.


